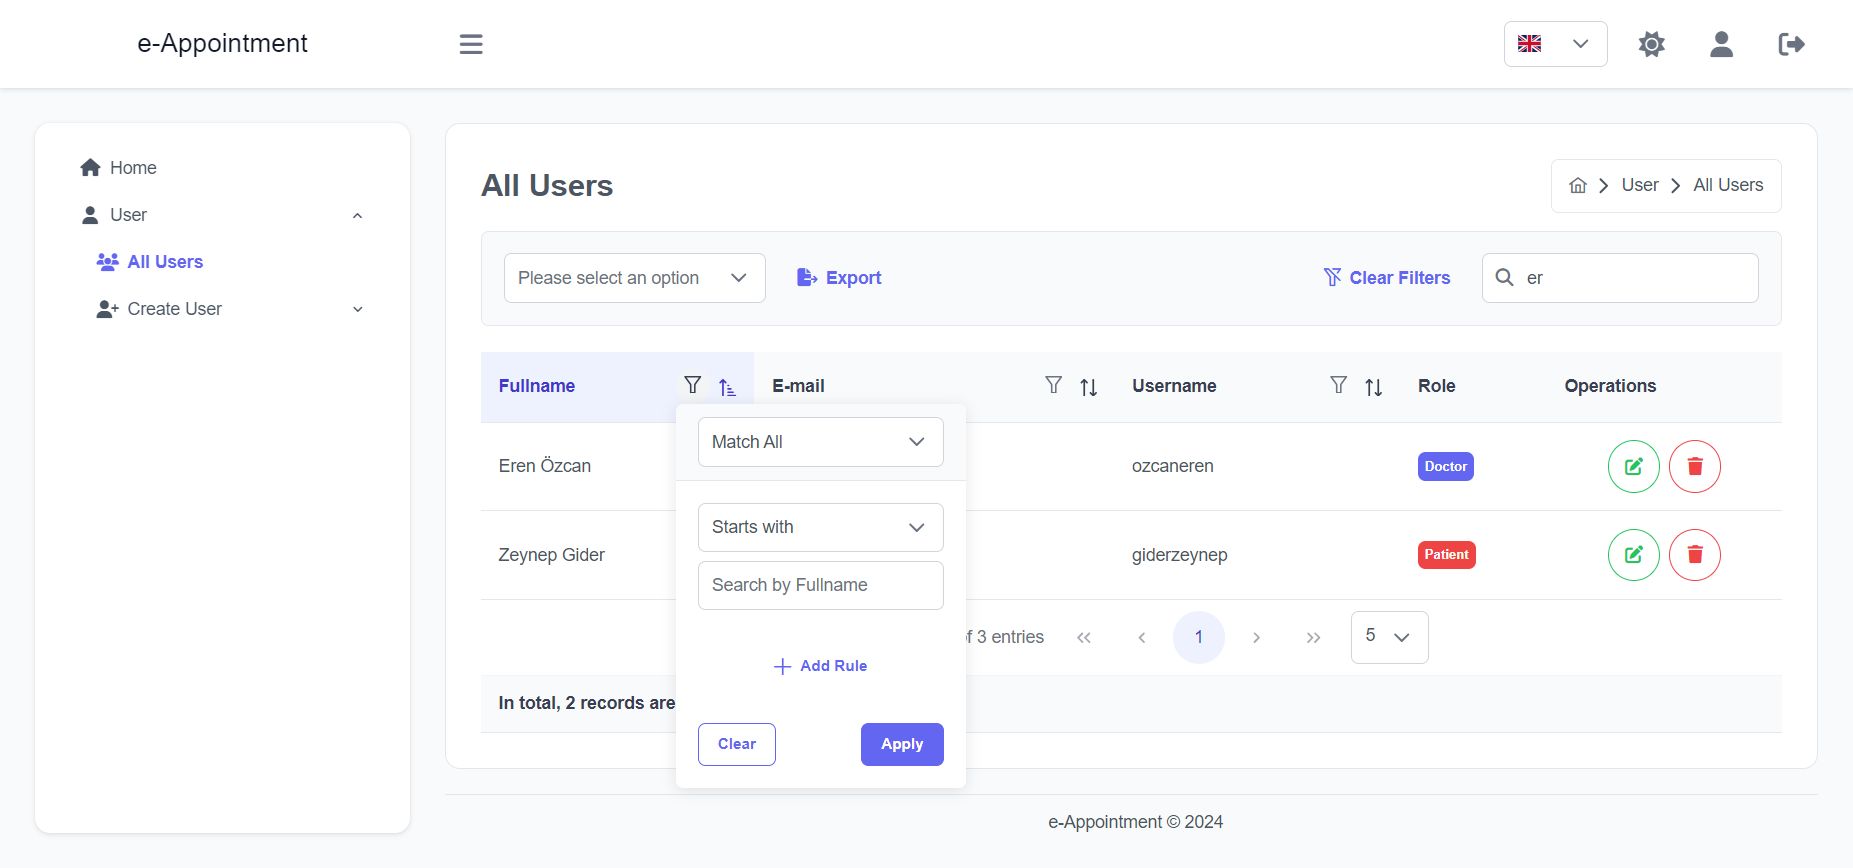
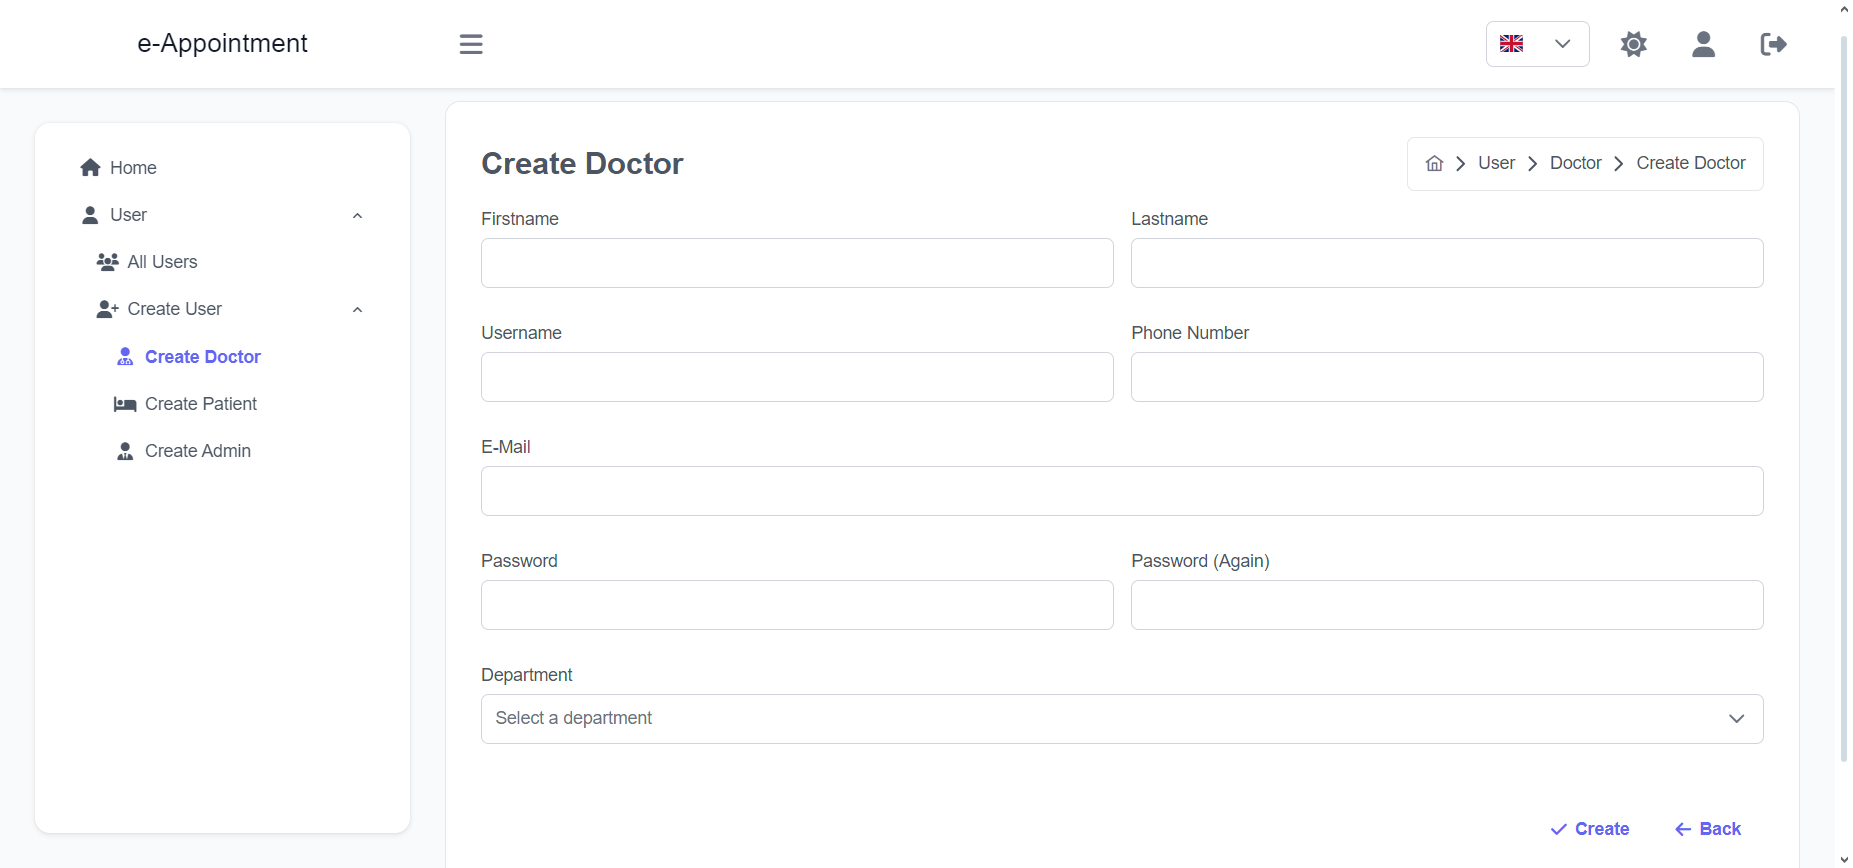
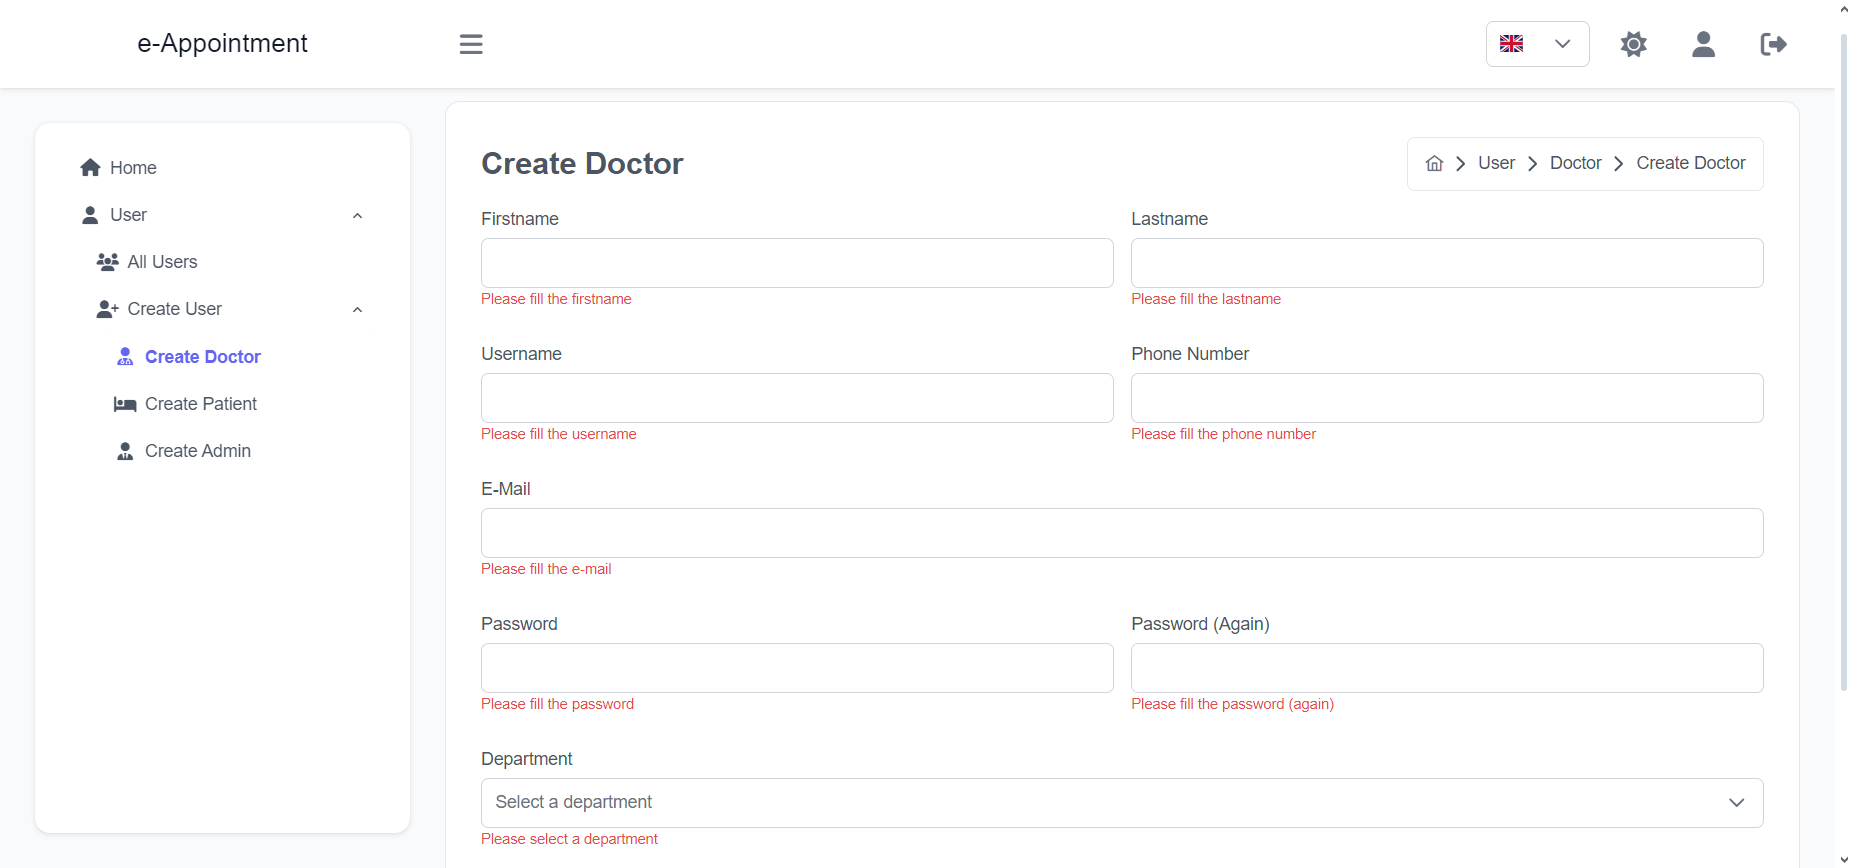
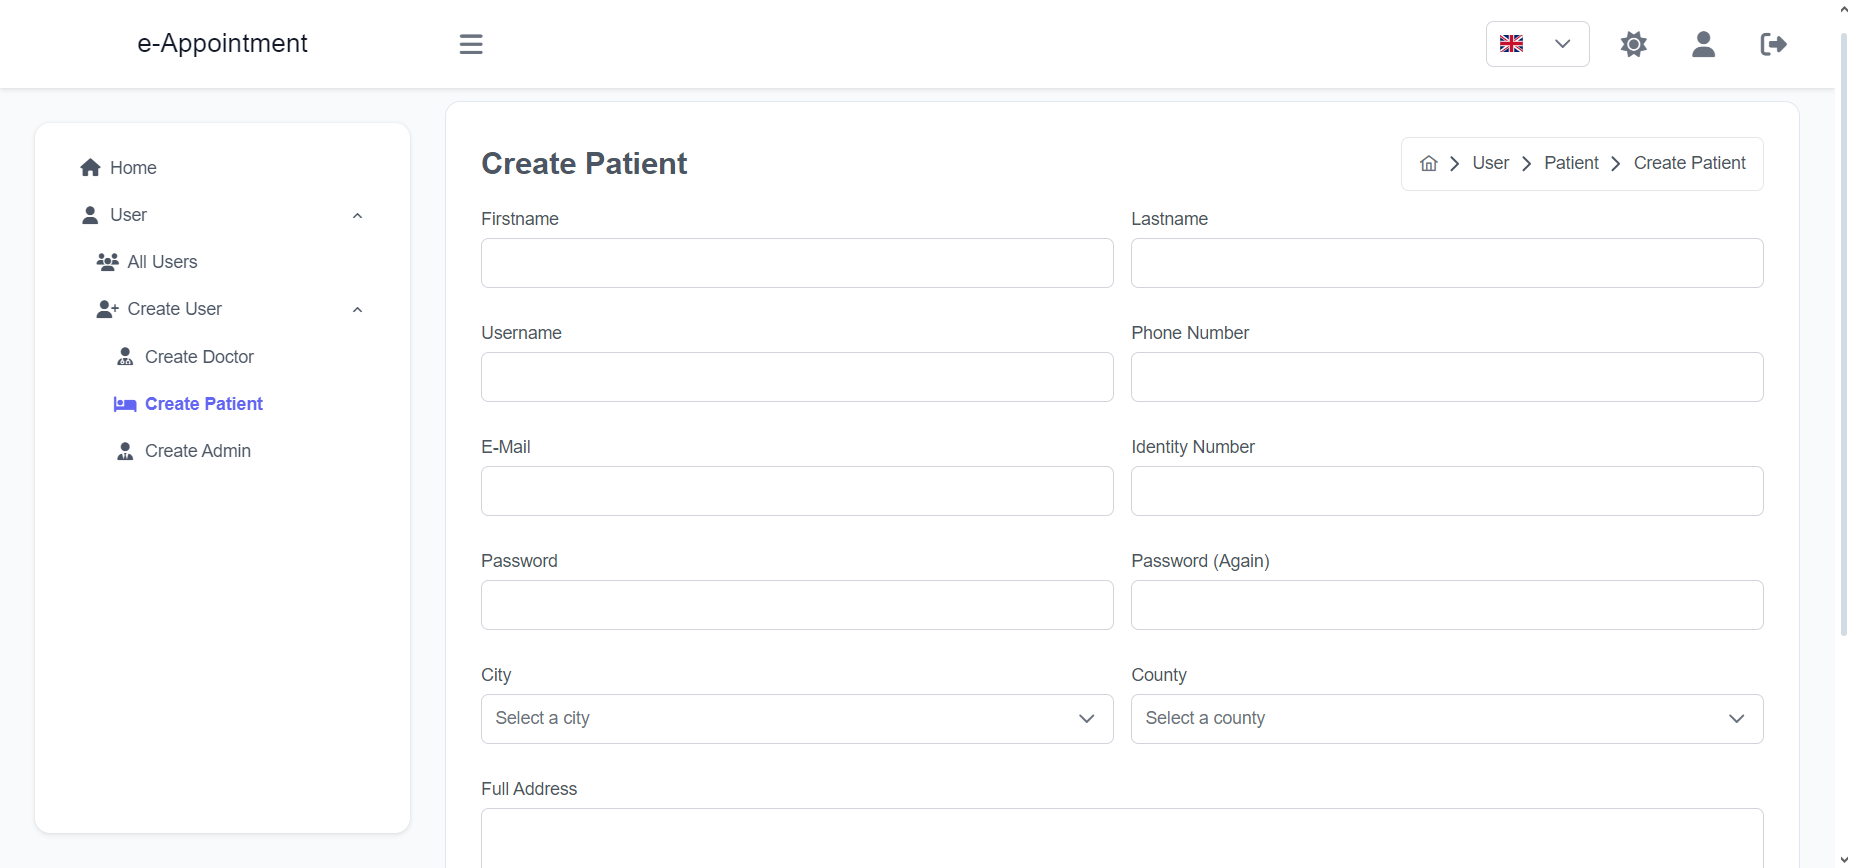
Import the package in your Flutter file and use one of these 2 alternatives to display your icons:
import'package:arco_design_icons/arco_design_icons.dart';
/// Alternative 1 - Using Icon widget:Icon _icon =Icon(ArcoDesignIcons.fire, size:48.0);
/// Alternative 2 - Using ArcoDesignIcon widget:Icon _icon =ArcoDesignIcon(ArcoDesignIcons.fire);
All Arco Design icons can be viewed on its Figma file here.
Find this library useful? ❤️
Support it by joining stargazers for this repository. ⭐️
Also, follow me on GitHub for my next project! 🤩
License
Copyright 2023 hanmajid (Muhammad Farhan Majid)

Licensed under the Apache License, Version 2.0 (the "License");
you may not use this file except in compliance with the License.
You may obtain a copy of the License at

   http://www.apache.org/licenses/LICENSE-2.0

Unless required by applicable law or agreed to in writing, software
distributed under the License is distributed on an "AS IS" BASIS,
WITHOUT WARRANTIES OR CONDITIONS OF ANY KIND, either express or implied.
See the License for the specific language governing permissions and
limitations under the License.
Shadowroller (https://shadowroller.net/) is work-in-progress a website that lets you roll lots of d6’s and follow Shadowrun’s dice rules.
There is a server (sr-server) which runs games for my friends.
This system is not available for the general internet at the moment.
You can run a local version of the server yourself if you’d like – it’s easy if
you’re comfortable with the command line and port forwarding. Please read the
Local development and Production environment sections first!
Local development
Editor setup
You will at the minimum want an editor which can handle Go and Typescript. IDE
support for both of these languages is available via the Language Server
protocol. You might need to install NodeJS and Go locally in order to have a
nice editor experience, in which case it may not be worth it to run Docker.
Docker
Running Shadowroller locally with Docker can be easier than running it manually,
but it can be a liiiitle slower to boot up.
If you’re unfamiliar with Docker, it may be a good idea to read up on the
basics. You can install docker from your package manager or
their website.
Shadowroller uses docker compose to run
containers in development. Running Shadowroller locally is just a matter of
typing
docker-compose up
in a terminal when you’re at the root directory of the project. The web and
server with both automatically refresh when changes are made in the web/ and
server/ directories.
If you install or upgrade dependencies (i.e. package.json,
package-lock.json, go.mod, or go.sum change), you’ll need to rebuild the
container(s) via docker-compose build web or docker-compose build server.
Locally
Take a look at the Makefile, it’s got a collection of basic scripts you can run.
The easiest way to run Shadowroller locally is to use
Tmuxp (a Python library) with
tmux. There’s a .tmuxp.yaml file which is
essentially a scripted way to run all the components in different terminals in
one tmux window. (If you’re a tmux or screen pro and could set this up with
shell script, I’ll happily accept your submission!)
This requires only
reflex, which you can replace with your
“watch-the-.go-files-and-rerun-go run-when-one-changes” script of your choice.
Redis (https://redis.io/):
At the time of writing, Shadowroller tries to add test games to the default Redisdatabase when it boots up in a dev environment.
You can use the provided configuration: redis-server redis/redis.conf. This
saves a persistent database to redis/sr-server.rdb and isolates Shadowroller
from any “default” Redis database. You can also simply use the built-in service
manager (i.e. systemctl enable redis or brew services start redis).
Server (Go) (https://golang.org)
Shadowroller may be using a version of Go newer than that provided by your
package manager. Go is typically installed
from its website. As mentioned above, you may
want a script to restart the server automatically when its .go files change.
Frontend (Typescript) (https://nodejs.org/)
Shadowroller’s frontend is compiled from
Typescript into a single-page app (SPA). In
development, npm run start (from the web directory) will run a hot-reloading
server (from Create React App). You can also
build the frontend yourself (via make build) and have the server host it.
You can run the frontend and backend independently if you like, but you can’t
run the server without Redis.
On production
You can totally run your own version of Shadowroller on the internet if you want
to! That’s the power of free software! Shadowroller runs perfectly fine on a
Raspberry Pi and there is plenty of configuration to help you out.
Please look at server/config/config.go to get a sense of some of the options.
For example, you can:
use SSL termination, an automatic Let’s Encrypt setup, or your own certificate
Host the frontend via a CDN or with the server
Please make sure you’ve read through config.go so you know what you’re doing!
It should be fairly easy to tweak the docker-compose.yaml file to include
these options, or even use Docker Swarm or Kubernetes. I’ve run shadowroller.net
from a Raspberry Pi B (the oldest Model B, the one with a single-core CPU)
without Docker.
Credits & Attribution
Shadowroller’s source code is licensed under the MIT license available in the
LICENSE file. Shadowroller is free software; you may redistribute or modify it
to your liking.
Shadowroller’s logo is (c) Alyssa Colon, licensed under
CC BY-NC-SA 4.0.
She’s @colon_capers on Instagram.
Shadwroller’s other non-software assets in assets/ (such as our dice icons) are licensed under
CC BY-NC-SA 4.0 – they may
be shared and adapted non-commercially and with attribution.
Shadowroller is built with React, with developer experience
greatly improved by Typescript.
Site UI and CSS is done via Styled Components.
React window provides a nicer scrolling experience.
Shadowroller’s server is written in Go, using the
Gorilla routers that build on top of the standard
library’s robust HTTP server. We use Redis for storage,
accessed via the go-redis library. We use
OpenTelementry for tracing and error reporting via
Uptrace.
This is a simple keylogger script implemented in Python 3 using the pynput library. It logs keypresses and stores them in a text file for later analysis.
Prerequisites
Before running the script, make sure you have Python 3.x installed on your system. You also need to install the pynput library. You can do this via pip:
How to Run
To run the keylogger, follow these steps:
Install the pynput library if you haven’t already (see Prerequisites above).
Clone or download this repository to your local machine.
Navigate to the directory containing the Keylogger.py file.
Open a terminal or command prompt in that directory.
Run the script using the following command:
pip install pynput
python Keylogger.py
How it Works
The keylogger listens for keyboard events using the pynput library. Each keypress is recorded and stored in a text file named log.txt in the same directory as the script.
To stop the keylogger, you can terminate the script manually by pressing Ctrl+C in the terminal or command prompt where it’s running.
Disclaimer
This script is provided for educational purposes only. Do not use it for any malicious purposes. Monitoring or recording someone’s keystrokes without their consent may violate privacy laws in your jurisdiction.
Este proyecto propone la confección de escritos académicos o de complejidad
considerable, sin la necesidad de interfaces gráficas. Promover el uso formatos
no codificados o de alta legibilidad beneficia a todos los usuarios, que deben
poder encontrar facilmente lo que necesitan, comprender lo que encuentran y
usarlo para realizar tareas @das.
El objetivo de este trabajo es un entorno de autoría de textos en el cual
Pandoc es la pieza central que actúa como interprete del sistema de
composición tipográfica y preparación de documentos de alta calidad LaTeX,
estándar de facto para la comunicación y publicación de documentos académicos
[@macfarlane; @knuth1986texbook].
Mediante integraciones sencillas se consigue una infraestructura robusta con
funciones diseñadas para gestionar exposición de extensas biblografías,
múltiples citas y referencias a diferentes fuentes, notación matemática,
generación de gráficos y diagramas, entre otras capacidades avanzadas,
necesarias en la producción de documentación técnica y científica, todo el
proceso es controlado mediante linea de comandos sin depender de interfaces
captivas, promoviendo la transparencia, claridad y reproducción
[@gancarz2003linux p.88-97].
Interfaz de usuario textual
La principal característica de las herramientas y formatos involucrados en este
proyecto es que están preparadas para interpretar instrucciones textuales. De
los beneficios que trabajar de este modo habilita se destacan cuestiones de
accesibilidad y la posibilidad de gestionar la exposición de conocimiento de la
misma manera que se produce software [@hunt1999pragmatic;
@moolenaar2000].
Separar contenido, referencias, estilos y procesos, en un contexto de
organizaciones con actividades relacionadas a la publicación, donde la
complejidad no solo reside en los documentos sino que también en la tarea que
involucra a múltiples agentes (autores, correctores y editores, entre otros)
devuelve el control de estilo a la organización. Garantiza unidad en estética
en la composición gráfica resultante de productos diversos.
Esta formación introducirá en la fuerza de trabajo una nueva capacidad con una
inclinación arraigada y fundamental hacia la investigación reproducible
@Baumer_Udwin_2015. El lenguaje sigue siendo la mejor interfaz que se ha
utilizado. Es sencillo, componible y ubicuo, está disponible en
todos los sistemas. Es fácil de mantener, automatizar y ampliar @scale.
Pandoc
Pandoc es una biblioteca de Haskell para convertir de un formato de
marcado ligero a otro, y una herramienta de línea de comandos que accede a las
funciones en esta biblioteca para convertir entre formatos y procesar textos
@marlow2010haskell.
El diseño de Pandoc es modular, esta conformado por un conjunto de lectores,
que analizan el texto en un formato determinado y producen una representación
nativa del documento en un árbol de sintaxis abstracta (Abstract Syntax Tree –
AST) y un conjunto de escritores, que convierten esta representación a un
formato de destino [@ASTImpl2003; @Neamtiu05understandingsource].
Markdown
Markdown es una sintaxis de formato de texto plano. El formato de texto es
el marcado que se aplica a un texto simple para añadir datos de estilo más allá
de la semántica de los elementos: colores, estilos, pesos tamaño, y
características especiales (como hipervínculos). Al texto resultante se le
conoce como texto formateado, texto con estilos, o texto enriquecido @gruber.
Lo que distingue a Markdown de muchas otras sintaxis de marcado ligero, es su
énfasis en la legibilidad. El objetivo principal del diseño de la sintaxis de
formato de Markdown es hacerla lo más legible posible. La idea es que un
documento con formato Markdown sea publicable tal cual, como texto plano, sin
que parezca que ha sido marcado con etiquetas o instrucciones de formato.
Pandoc comprende una serie de extensiones útiles de la sintaxis de markdown,
como los metadatos del documento (título, autor, fecha); las notas al pie; las
tablas; las listas de definiciones; los superíndices y subíndices; la
tachadura; las listas ordenadas mejoradas (el número de inicio y el estilo de
numeración son significativos); las listas de ejemplos en ejecución; los
bloques de código de software delimitados con resaltado de sintaxis; las
comillas inteligentes, los guiones y las elipses; el Markdown dentro de
bloques HTML; y el LaTeX en línea.
Metodotología
En este capitulo se describe el método propuesto y utilizado para producir el
presente documento.
Primero se describe la integración de diferentes piezas de software, algunas
distribuidas junto con Pandoc y otras aportes independientes de la comunidad.
Seguido se presenta el filtro de diagramación y generación gráficos que permite
crear visualizaciones utilizando texto y código. Luego se expone el sistema
citas y referencias bibliográficas. Para concluir este capitulo se exponen
cuestiones relacionadas a la notación matemática.
Integración
El diseño de Pandoc es modular: consta de un conjunto de lectores, que
analizan el texto en un formato determinado y producen una representación
nativa del documento (Abstract Sintactic Three – AST), y un conjunto de
registros, que convierten esta representación nativa en un formato de destino.
Ademas, incluye un potente sistema para escribir filtros, para incluir un
formato de entrada o de salida basta con añadir un lector o un escritor.
También es posible crear filtros personalizados para modificar el AST
intermedio.
De las múltiples maneras de personalizar Pandoc para que se adapte a los
requisitos de cada proyecto, se destaca el uso de un sistema de plantillas, un
potente sistema de citas y bibliografías automáticas y la generación de
gráficos mediante código.
Gráficos y diagramas
La diagramación conlleva tiempo a los investigadores y desarrolladores, los
gráficos producidos suelen quedar obsoletos rápidamente. Pero no tener
diagramas o documentación arruina la productividad y perjudica el aprendizaje
de la organización.
Se destina esta tarea a pandoc-plot, un filtro de Pandoc para generar
figuras a partir de bloques de código en los documentos @pandocplot.
actualmente, pandoc-plot es compatible con el siguiente conjunto de
herramientas de trazado: matplotlib; plotly_python, plotly_r, matlabplot,
mathplot, octaveplot, ggplot2, gnuplot, graphviz, bokeh, plotsjl y plantuml.
En este trabajo se implementan dos de ellas, Matplotlib y PlantUML
[@matplotlib; @plantuml]. En los apartados a continuación se exponen gráficos
generados con dichas herramientas partir del condigo incluido en el fichero
Markdown original, para demostrar las posibilidades de esta herramienta.
Matplotlib
import numpy as np
import matplotlib.pyplot as plt

theta = np.arange(0, 2 * np.pi, .01)[1:]
r = theta - np.pi
positive_r = r >= 0

fig, (ax1, ax2) = plt.subplots(ncols=2, figsize=(10, 5), subplot_kw={'polar': True})

for ax in (ax1, ax2):
  if ax == ax2:
    # change negative r values to positive, rotating theta by 180º
    theta = np.where(r >= 0, theta, theta + np.pi)
    r = np.abs(r)
  ax.plot(theta[positive_r], r[positive_r], color='skyblue')
  ax.plot(theta[~positive_r], r[~positive_r], color='tomato')
ax1.set_title('Default: negative $r$\non same side as $theta$')
ax2.set_title('Negative $r$ on other side')
import numpy as np
import matplotlib.pyplot as plt

r = np.arange(0, 2, 0.01)
theta = 2 * np.pi * r
fig, ax = plt.subplots(
  subplot_kw = {'projection': 'polar'}
)
ax.plot(theta, r)
ax.set_rticks([0.5, 1, 1.5, 2])
ax.grid(True)
plt.title('This is an example figure')
import numpy as np
import matplotlib.pyplot as plt

np.random.seed(23)

# Compute areas and colors
N = 150
r = 2 * np.random.rand(N)
theta = 2 * np.pi * np.random.rand(N)
area = 200 * r**2
colors = theta

# fig = plt.figure()
fig = plt.figure(dpi=1200)

ax = fig.add_subplot(111, projection='polar')
c = ax.scatter(theta, r, c=colors, s=area, cmap='hsv', alpha=0.75)
plt.title('This is an example figure')
@startuml
robust "DNS Resolver" as DNS
robust "Web Browser" as WB
concise "Web User" as WU

@0
WU is Idle
WB is Idle
DNS is Idle

@+100
WU -> WB : URL
WU is Waiting
WB is Processing

@+200
WB is Waiting
WB -> DNS@+50 : Resolve URL

@+100
DNS is Processing

@+300
DNS is Idle
@enduml
Citas, referencias y bibliografía
Para citar, enlazar a referencias y exposición de bibliografía consultada se
emplea BibLaTeX, una herramienta y un formato de archivo que se utilizan para
describir y procesar listas de referencias, sobre todo en combinación con
documentos LaTeX.
Los datos bibliográficos de entrada pueden estar en formato BibTeX, BibLaTeX,
CSL JSON o CSL YAML. Las citas funcionan en todos los formatos de salida.
BibLaTeX
BibLaTeX una reimplementación completa de las facilidades bibliográficas
proporcionadas por LaTeX. Esto significa, por ejemplo que al declarar una
referencia como @moolenaar2000 o también [@knuth1986texbook p.3-9]Pandoc
las convertirá en una cita con el formato predefinido, utilizando cualquiera de
los cientos de Lenguajes de Estilo de Cita (Citation Style Language – CSL),
incluyendo estilos de nota al pie, numéricos y autoría, fuente y fechas; y
añadirá a la referencia bibliografía con el formato adecuado al final del
documento.
El formato de la bibliografía está totalmente controlado por las macros de
LaTeX, y un conocimiento práctico de LaTeX debería ser suficiente para
diseñar nuevos estilos de bibliografía y citación. BibLaTeX tiene muchas
características que rivalizan o superan a otros sistemas bibliográficos.
Lenguaje de Estilo de Citación
La referencias son una pieza clave en la comunicación académica, ya que
proporcionan la atribución y enlazan referencias. Sin embargo, formatear
manualmente las referencias puede llevar mucho tiempo, especialmente cuando se
trata de múltiples publicaciones con diferentes estilos de citación.
El software de gestión de referencias no sólo ayuda a gestionar bibliotecas de
investigación, sino que también pueden generar automáticamente citas y
bibliografías. Para formatear las referencias en el estilo deseado, estos
programas necesitan descripciones de cada estilo de citación en un lenguaje que
el ordenador pueda entender, el Lenguaje de Estilo de Citación (Citation Style
Languaje – CSL) es el descriptor utilizado es un formato basado en XML para
describir el formato de citas, notas y bibliografías @zellecitation.
Pandoc crossref
pandoc-crossref es un filtro de para numerar figuras, ecuaciones, tablas y
referencias cruzadas a las mismas @crossref. En Apéndice B @sec:apendixB, se expone
el documento oficial de demostración de las capacidades de esta herramienta,
incluido en la cadena de procesos de estos proyectos.
Notación matemática
Las matemáticas de LaTeX (e incluso las macros) pueden utilizarse en los
documentos de Markdown. Las matemáticas de LaTeX se convierten (según lo
requiera el formato de salida) en unicode, objetos de ecuación nativos de Word,
MathML o roff eqn.
Se proporcionan varios métodos diferentes para representar las matemáticas
incluyendo sintaxis MathJax y la traducción a MathML.
Cuando $a \ne 0$, hay dos soluciones a (ax^2 + bx + c = 0) las cuales son $$x
= {-b \pm \sqrt{b^2-4ac} \over 2a}.$$
Transformación de contenidos: EpubMathJax
proporciona herramientas para transformar sus contenidos de fuentes impresas
tradicionales en contenidos web y ePubs modernos y accesibles.
Tipografía de alta calidad: MathJax utiliza fuentes SVG, en lugar de de
imágenes de mapa de bits, por lo que las ecuaciones se escalan con el
texto circundante.
Modular la entrada y la salida: MathJax es altamente modular en la entrada
y la salida. Utiliza MathML, TeX, y ASCIImath como entrada y MathML como
salida.
Accesible y reutilizable: MathJax funciona con lectores de pantalla y
proporciona zoom de expresión y exploración interactiva. También puede copiar
ecuaciones en Office, LaTeX, wikis y otro software.
Resultados
El resultado es la integración de diferentes piezas de software y andamiaje
necesario para reproducir este proyecto: fuentes de entrada, configuraciones,
estructura, filtros, plantillas (LaTeX, CLSs, resaltado de sintaxis) y un
ejemplo de acciones remotas para entrega continua.
Para recrear este proceso, principalmente hay 2 opciones:
La más directa es realizar un fork del repositorio en el cual esta alojado el
contenido en linea [@fork, @repo]. Después de realizar modificaciones necesarias,
esto dispara acciones en el repositorio y genera este documento.
Para trabajar en una copia local es necesario es ejecutar los siguientes
comandos en una terminal de sistema para clonar el contenido, inicializar el
proyecto y generar el documento 1.
Hay un aspecto en el que los objetivos de Pandoc difieren de los originales
de Markdown. Mientras que Markdown fue diseñado para la generación de HTML en
mente, Pandoc está preparado para producir múltiples formatos de salida.
En Apéndice A (@Sec:apendixA) se expone la versión mejorada de Markdown de
Pandoc que comprende una versión ampliada y ligeramente revisada de la
sintaxis original2. Incluye sintaxis para tablas, listas de definiciones,
bloques de metadatos, notas a pie de página, citas y matemáticas y entre otros
@pandocmd.
Numeración y referencias cruzadas
Para consultar una lista completa de las funcionalidades avanzadas de
pandoc-crossref, el filtro de pandoc para realizar referencias cruzadas,
acompaña este artículo la demostración de su autor en Apéndice B
(@Sec:apendixB).
Conclusión
Este capítulo concluye el estudio. En primer lugar, se cubren los
objetivos de investigación. El segundo subcapítulo presenta la
contribución de este trabajo, y los dos últimos subapartados
presentan las limitaciones del estudio y las sugerencias para
desarrollos futuros, respectivamente.
Alcance
El animo de este proyecto es desarrollar una cadena de producción
de documentos científicos y técnicos sin depender de interfaces
gráficas o captivas.
Las características generales de este entorno son: formatos libres
y abiertos, componentes aislados, compactos y robustos; amplia
compatibilidad con requisitos de estilo, predefinidos por la
comunidad o personalizados por el usuario. Vinculación a fuentes
de datos remotas para publicaciones recurrentes con información
dinámica.
Aporte
Es intención que este trabajo sirva como punto de partida en
contextos similares, reutilizando patrones de diseño y siguiendo
guía de buenas prácticas en la producción de documentos gráficos
de alta complejidad.
Si bien este proyecto está enfocado a la producción de literatura
académica, esta misma cadena de producción puede ser aplicada en
el desarrollo de cualquier otro sistema como por ejemplo, gestión
documental, registros médicos, documentos legales, certificados
legales, entre otros.
En una implementación organizacional esto puede ser aprovechado como servicio
remoto de preparación de documentos gráficos. En aquellos contextos que los
productos gráficos se generan mediante rutinas directamente de bases de datos,
una capa codificada extra que opaca la relación entre el interprete y el
contenido, se recomienda un proceso similar al descripto de respaldo de la
información en contenedores de formato simple y legible, sin codificar.
Aunque los escuadrones sean autónomos, es importante que los
especialistas (por ejemplo, editores) se alineen en las mejores
prácticas.
Limitaciones
Dado que la representación intermedia de un documento por parte de
Pandoc es menos expresiva que muchos de los formatos entre los
que convierte, no hay que esperar conversiones exactas entre todos
los formatos. Mientras que las conversiones de Markdown de
Pandoc a todos los formatos aspiran a ser perfectas, las
conversiones de formatos más expresivos pueden tener diferencias.
Pandoc intenta conservar los elementos estructurales de un
documento, pero no los detalles de formato, como el tamaño de los
márgenes. Algunos elementos del documento, como por ejemplo tablas
complejas, pueden no encajar en el modelo de documento simple de
Pandoc.
Futuras lineas de trabajo
Se señalan como áreas de desarrollo, primero las acciones remotas automáticas
con el fin de generar entregas continuas y seguido, las configuraciones
especiales para investigaciones del tipo revisión sistemática de literatura
@Kitchenham2006.
Entrega continua
Como se puede comprar en el repositorio que aloja este proyecto el
documento PDF de salida puede ser producido mediante Operaciones remotas
automáticas @actions.
Servicios como estos acortan las brecha entre las actividades y los equipos de
producción, al imponer la automatización en la construcción y entrega de
documentos. Los servicios de entrega continua compilan los cambios
incrementales en el contenido de los autores, los enlazan, los empaquetan y los
ejecutan en un entorno remoto preconfigurado.
Revisión sistemática de literatura
Este proceder promueve capacidades como ordenación personalizable,
bibliografías jerarquizadas por sección, soporte de poliglosia para el cambio
automático de idioma de las entradas y citas bibliográficas; modelo de datos
personalizable para que los usuarios puedan definir sus propios tipos de datos
bibliográficos y validarlos con respecto a un modelo.
En investigaciones del tipo revisiones de literatura, donde se involucran
múltiples cuerpos bibliográficos con diferente ordenación y exposición,
enfoques como el desarrollado simplifican el trabajo y asisten en el proceso.
Apendice A: Pandoc’s Markdown {#sec:apendixA}
Pandoc understands an extended and slightly revised version of
John Gruber’s [Markdown] syntax. This document explains the syntax,
noting differences from original Markdown.
Paragraphs {.unlisted .unnumbered}
A paragraph is one or more lines of text followed by one or more blank lines.
Newlines are treated as spaces, so you can reflow your paragraphs as you like.
If you need a hard line break, put two or more spaces at the end of a line.
A backslash followed by a newline is also a hard line break.
Note: in multiline and grid table cells, this is the only way
to create a hard line break, since trailing spaces in the cells
are ignored.
Headings{.unlisted .unnumbered}
There are two kinds of headings: Setext and ATX.
Setext-style headings ###{.unlisted .unnumbered}
A setext-style heading is a line of text “underlined” with a row of = signs
(for a level-one heading) or - signs (for a level-two heading):
A level-one heading
===================

A level-two heading
-------------------
The heading text can contain inline formatting, such as emphasis (see
[Inline formatting], below).
ATX-style headings ###{.unlisted .unnumbered}
An ATX-style heading consists of one to six # signs and a line of
text, optionally followed by any number of # signs. The number of
# signs at the beginning of the line is the heading level:
## A level-two heading

### A level-three heading ###
As with setext-style headings, the heading text can contain formatting:
# A level-one heading with a [link](/url) and *emphasis*
Original Markdown syntax does not require a blank line before a heading.
Pandoc does require this (except, of course, at the beginning of the
document). The reason for the requirement is that it is all too easy for a
# to end up at the beginning of a line by accident (perhaps through line
wrapping). Consider, for example:
I like several of their flavors of ice cream:
#22, for example, and #5.
Many Markdown implementations do not require a space between the
opening #s of an ATX heading and the heading text, so that
#5 bolt and #hashtag count as headings. With this extension,
pandoc does require the space.
Headings can be assigned attributes using this syntax at the end
of the line containing the heading text:
{#identifier .class .class key=value key=value}
Thus, for example, the following headings will all be assigned the identifier
foo:
# My heading {#foo}

## My heading ##    {#foo}

My other heading   {#foo}
---------------
(This syntax is compatible with [PHP Markdown Extra].)
Note that although this syntax allows assignment of classes and key/value
attributes, writers generally don’t use all of this information. Identifiers,
classes, and key/value attributes are used in HTML and HTML-based formats such
as EPUB and slidy. Identifiers are used for labels and link anchors in the
LaTeX, ConTeXt, Textile, Jira markup, and AsciiDoc writers.
Headings with the class unnumbered will not be numbered, even if
--number-sections is specified. A single hyphen (-) in an attribute
context is equivalent to .unnumbered, and preferable in non-English
documents. So,
# My heading {.unlisted .unnumbered}
is just the same as
# My heading {.unnumbered}
If the unlisted class is present in addition to unnumbered,
the heading will not be included in a table of contents.
(Currently this feature is only implemented for certain
formats: those based on LaTeX and HTML, PowerPoint, and RTF.)
Pandoc behaves as if reference links have been defined for each heading.
So, to link to a heading
# Heading identifiers in HTML
you can simply write
[Heading identifiers in HTML]
or
[Heading identifiers in HTML][]
or
[the section on heading identifiers][heading identifiers in
HTML]
instead of giving the identifier explicitly:
[Heading identifiers in HTML](#heading-identifiers-in-html)
If there are multiple headings with identical text, the corresponding
reference will link to the first one only, and you will need to use explicit
links to link to the others, as described above.
Like regular reference links, these references are case-insensitive.
Explicit link reference definitions always take priority over
implicit heading references. So, in the following example, the
link will point to bar, not to #foo:
# Foo

[foo]: bar

See [foo]
Block quotations{.unlisted .unnumbered}
Markdown uses email conventions for quoting blocks of text.
A block quotation is one or more paragraphs or other block elements
(such as lists or headings), with each line preceded by a > character
and an optional space. (The > need not start at the left margin, but
it should not be indented more than three spaces.)
> This is a block quote. This
> paragraph has two lines.
>
> 1. This is a list inside a block quote.
> 2. Second item.
A “lazy” form, which requires the > character only on the first
line of each block, is also allowed:
> This is a block quote. This
paragraph has two lines.

> 1. This is a list inside a block quote.
2. Second item.
Among the block elements that can be contained in a block quote are
other block quotes. That is, block quotes can be nested:
> This is a block quote.
>
> > A block quote within a block quote.
If the > character is followed by an optional space, that space
will be considered part of the block quote marker and not part of
the indentation of the contents. Thus, to put an indented code
block in a block quote, you need five spaces after the >:
Original Markdown syntax does not require a blank line before a
block quote. Pandoc does require this (except, of course, at
the beginning of the document). The reason for the requirement
is that it is all too easy for a > to end up at the beginning
of a line by accident (perhaps through line wrapping). So,
unless the markdown_strict format is used, the following does
not produce a nested block quote in pandoc:
> This is a block quote.
>> Nested.
Verbatim (code) blocks{.unlisted .unnumbered}
Indented code blocks ###{.unlisted .unnumbered}
A block of text indented four spaces (or one tab) is treated as verbatim
text: that is, special characters do not trigger special formatting,
and all spaces and line breaks are preserved. For example,
    if (a > 3) {
      moveShip(5 * gravity, DOWN);
    }
The initial (four space or one tab) indentation is not considered part
of the verbatim text, and is removed in the output.
Note: blank lines in the verbatim text need not begin with four spaces.
In addition to standard indented code blocks, pandoc supports
fenced code blocks. These begin with a row of three or more
tildes (~) and end with a row of tildes that must be at least as long as
the starting row. Everything between these lines is treated as code. No
indentation is necessary:
~~~~~~~
if (a > 3) {
  moveShip(5 * gravity, DOWN);
}
~~~~~~~
Like regular code blocks, fenced code blocks must be separated
from surrounding text by blank lines.
If the code itself contains a row of tildes or backticks, just use a longer
row of tildes or backticks at the start and end:
~~~~~~~~~~~~~~~~
~~~~~~~~~~
code including tildes
~~~~~~~~~~
~~~~~~~~~~~~~~~~
Here mycode is an identifier, haskell and numberLines are
classes, and startFrom is an attribute with value 100. Some
output formats can use this information to do syntax
highlighting. Currently, the only output formats that use this
information are HTML, LaTeX, Docx, Ms, and PowerPoint. If
highlighting is supported for your output format and language,
then the code block above will appear highlighted, with numbered
lines. (To see which languages are supported, type pandoc --list-highlight-languages.) Otherwise, the code block above
will appear as follows:
The numberLines (or number-lines) class will cause the lines
of the code block to be numbered, starting with 1 or the value
of the startFrom attribute. The lineAnchors (or
line-anchors) class will cause the lines to be clickable
anchors in HTML output.
A shortcut form can also be used for specifying the language of
the code block:
```haskell
qsort [] = []
```
This is equivalent to:
``` {.haskell}
qsort [] = []
```
This shortcut form may be combined with attributes:
```haskell {.numberLines}
qsort [] = []
```
Which is equivalent to:
``` {.haskell .numberLines}
qsort [] = []
```
If the fenced_code_attributes extension is disabled, but
input contains class attribute(s) for the code block, the first
class attribute will be printed after the opening fence as a bare
word.
To prevent all highlighting, use the --no-highlight flag.
To set the highlighting style, use --highlight-style.
For more information on highlighting, see [Syntax highlighting],
below.
A line block is a sequence of lines beginning with a vertical bar (|)
followed by a space. The division into lines will be preserved in
the output, as will any leading spaces; otherwise, the lines will
be formatted as Markdown. This is useful for verse and addresses:
| The limerick packs laughs anatomical
| In space that is quite economical.
|    But the good ones I've seen
|    So seldom are clean
| And the clean ones so seldom are comical

| 200 Main St.
| Berkeley, CA 94718
The lines can be hard-wrapped if needed, but the continuation
line must begin with a space.
| The Right Honorable Most Venerable and Righteous Samuel L.
  Constable, Jr.
| 200 Main St.
| Berkeley, CA 94718
Inline formatting (such as emphasis) is allowed in the content,
but not block-level formatting (such as block quotes or lists).
This syntax is borrowed from [reStructuredText].
Lists{.unlisted .unnumbered}
Bullet lists ###{.unlisted .unnumbered}
A bullet list is a list of bulleted list items. A bulleted list
item begins with a bullet (*, +, or -). Here is a simple
example:
* one
* two
* three
This will produce a “compact” list. If you want a “loose” list, in which
each item is formatted as a paragraph, put spaces between the items:
* one

* two

* three
The bullets need not be flush with the left margin; they may be
indented one, two, or three spaces. The bullet must be followed
by whitespace.
List items look best if subsequent lines are flush with the first
line (after the bullet):
* here is my first
  list item.
* and my second.
But Markdown also allows a “lazy” format:
* here is my first
list item.
* and my second.
Block content in list items
A list item may contain multiple paragraphs and other block-level
content. However, subsequent paragraphs must be preceded by a blank line
and indented to line up with the first non-space content after
the list marker.
  * First paragraph.

    Continued.

  * Second paragraph. With a code block, which must be indented
    eight spaces:

        { code }
Exception: if the list marker is followed by an indented code
block, which must begin 5 spaces after the list marker, then
subsequent paragraphs must begin two columns after the last
character of the list marker:
*     code

  continuation paragraph
List items may include other lists. In this case the preceding blank
line is optional. The nested list must be indented to line up with
the first non-space character after the list marker of the
containing list item.
* fruits
  + apples
    - macintosh
    - red delicious
  + pears
  + peaches
* vegetables
  + broccoli
  + chard
As noted above, Markdown allows you to write list items “lazily,” instead of
indenting continuation lines. However, if there are multiple paragraphs or
other blocks in a list item, the first line of each must be indented.
+ A lazy, lazy, list
item.

+ Another one; this looks
bad but is legal.

    Second paragraph of second
list item.
Ordered lists ###{.unlisted .unnumbered}
Ordered lists work just like bulleted lists, except that the items
begin with enumerators rather than bullets.
In original Markdown, enumerators are decimal numbers followed
by a period and a space. The numbers themselves are ignored, so
there is no difference between this list:
Unlike original Markdown, pandoc allows ordered list items to be marked
with uppercase and lowercase letters and roman numerals, in addition to
Arabic numerals. List markers may be enclosed in parentheses or followed by a
single right-parenthesis or period. They must be separated from the
text that follows by at least one space, and, if the list marker is a
capital letter with a period, by at least two spaces.3
The fancy_lists extension also allows ‘#‘ to be used as an
ordered list marker in place of a numeral:
#. one
#. two
Extension: startnum ####{.unlisted .unnumbered}
Pandoc also pays attention to the type of list marker used, and to the
starting number, and both of these are preserved where possible in the
output format. Thus, the following yields a list with numbers followed
by a single parenthesis, starting with 9, and a sublist with lowercase
roman numerals:
9) Ninth
10) Tenth
11) Eleventh
i. subone
ii. subtwo
iii. subthree
Pandoc will start a new list each time a different type of list
marker is used. So, the following will create three lists:
(2) Two
(5) Three
1. Four
* Five
If default list markers are desired, use #.:
#. one
#. two
#. three
Extension: task_lists ####{.unlisted .unnumbered}
Pandoc supports task lists, using the syntax of GitHub-Flavored Markdown.
- [ ] an unchecked task list item
- [x] checked item
Pandoc supports definition lists, using the syntax of
[PHP Markdown Extra] with some extensions.4
Term 1
: Definition 1
Term 2 with *inline markup*
: Definition 2
{ some code, part of Definition 2 }
Third paragraph of definition 2.
Each term must fit on one line, which may optionally be followed by
a blank line, and must be followed by one or more definitions.
A definition begins with a colon or tilde, which may be indented one
or two spaces.
A term may have multiple definitions, and each definition may
consist of one or more block elements (paragraph, code block,
list, etc.), each indented four spaces or one tab stop. The
body of the definition (not including the first line)
should be indented four spaces. However, as with
other Markdown lists, you can “lazily” omit indentation except
at the beginning of a paragraph or other block element:
Term 1
: Definition
with lazy continuation.
Second paragraph of the definition.
If you leave space before the definition (as in the example above),
the text of the definition will be treated as a paragraph. In some
output formats, this will mean greater spacing between term/definition
pairs. For a more compact definition list, omit the space before the
definition:
Term 1
~ Definition 1
Term 2
~ Definition 2a
~ Definition 2b
Note that space between items in a definition list is required.
(A variant that loosens this requirement, but disallows “lazy”
hard wrapping, can be activated with compact_definition_lists: see
[Non-default extensions], below.)
The special list marker @ can be used for sequentially numbered
examples. The first list item with a @ marker will be numbered ‘1’,
the next ‘2’, and so on, throughout the document. The numbered examples
need not occur in a single list; each new list using @ will take up
where the last stopped. So, for example:
(@) My first example will be numbered (1).
(@) My second example will be numbered (2).
Explanation of examples.
(@) My third example will be numbered (3).
Numbered examples can be labeled and referred to elsewhere in the
document:
(@good) This is a good example.
As (@good) illustrates, ...
The label can be any string of alphanumeric characters, underscores,
or hyphens.
Note: continuation paragraphs in example lists must always
be indented four spaces, regardless of the length of the
list marker. That is, example lists always behave as if the
four_space_rule extension is set. This is because example
labels tend to be long, and indenting content to the
first non-space character after the label would be awkward.
Ending a list ###{.unlisted .unnumbered}
What if you want to put an indented code block after a list?
- item one
- item two
{ my code block }
Trouble! Here pandoc (like other Markdown implementations) will treat
{ my code block } as the second paragraph of item two, and not as
a code block.
To “cut off” the list after item two, you can insert some non-indented
content, like an HTML comment, which won’t produce visible output in
any format:
- item one
- item two
<!-- end of list -->
{ my code block }
You can use the same trick if you want two consecutive lists instead
of one big list:
1.  one
2.  two
3.  three
<!-- -->
1. uno
2. dos
3. tres
Horizontal rules{.unlisted .unnumbered}
A line containing a row of three or more *, -, or _ characters
(optionally separated by spaces) produces a horizontal rule:
*  *  *  *

---------------
We strongly recommend that horizontal rules be separated from
surrounding text by blank lines. If a horizontal rule is not
followed by a blank line, pandoc may try to interpret the
lines that follow as a YAML metadata block or a table.
Tables{.unlisted .unnumbered}
Four kinds of tables may be used. The first three kinds presuppose the use of
a fixed-width font, such as Courier. The fourth kind can be used with
proportionally spaced fonts, as it does not require lining up columns.
Extension: table_captions
A caption may optionally be provided with all 4 kinds of tables (as
illustrated in the examples below). A caption is a paragraph beginning
with the string Table: (or table: or just :), which will be stripped
off. It may appear either before or after the table.
  Right     Left     Center     Default
-------     ------ ----------   -------
     12     12        12            12
    123     123       123          123
      1     1          1             1

Table:  Demonstration of simple table syntax.
The header and table rows must each fit on one line. Column
alignments are determined by the position of the header text relative
to the dashed line below it:5
If the dashed line is flush with the header text on the right side
but extends beyond it on the left, the column is right-aligned.
If the dashed line is flush with the header text on the left side
but extends beyond it on the right, the column is left-aligned.
If the dashed line extends beyond the header text on both sides,
the column is centered.
If the dashed line is flush with the header text on both sides,
the default alignment is used (in most cases, this will be left).
The table must end with a blank line, or a line of dashes followed by
a blank line.
The column header row may be omitted, provided a dashed line is used
to end the table. For example:
When the header row is omitted, column alignments are determined on the basis
of the first line of the table body. So, in the tables above, the columns
would be right, left, center, and right aligned, respectively.
Extension: multiline_tables
Multiline tables allow header and table rows to span multiple lines
of text (but cells that span multiple columns or rows of the table are
not supported). Here is an example:
-------------------------------------------------------------
 Centered   Default           Right Left
  Header    Aligned         Aligned Aligned
----------- ------- --------------- -------------------------
   First    row                12.0 Example of a row that
                                    spans multiple lines.

  Second    row                 5.0 Here's another one. Note
                                    the blank line between
                                    rows.
-------------------------------------------------------------

Table: Here's the caption. It, too, may span
multiple lines.
These work like simple tables, but with the following differences:
They must begin with a row of dashes, before the header text
(unless the header row is omitted).
They must end with a row of dashes, then a blank line.
The rows must be separated by blank lines.
In multiline tables, the table parser pays attention to the widths of
the columns, and the writers try to reproduce these relative widths in
the output. So, if you find that one of the columns is too narrow in the
output, try widening it in the Markdown source.
The header may be omitted in multiline tables as well as simple tables:
----------- ------- --------------- -------------------------
   First    row                12.0 Example of a row that
                                    spans multiple lines.

  Second    row                 5.0 Here's another one. Note
                                    the blank line between
                                    rows.
----------- ------- --------------- -------------------------

: Here's a multiline table without a header.
It is possible for a multiline table to have just one row, but the row
should be followed by a blank line (and then the row of dashes that ends
the table), or the table may be interpreted as a simple table.
The row of =s separates the header from the table body, and can be
omitted for a headerless table. The cells of grid tables may contain
arbitrary block elements (multiple paragraphs, code blocks, lists,
etc.). Cells that span multiple columns or rows are not
supported. Grid tables can be created easily using Emacs’ table-mode
(M-x table-insert).
Alignments can be specified as with pipe tables, by putting
colons at the boundaries of the separator line after the
header:
+---------------+---------------+--------------------+
| Right         | Left          | Centered           |
+==============:+:==============+:==================:+
| Bananas       | $1.34         | built-in wrapper   |
+---------------+---------------+--------------------+
For headerless tables, the colons go on the top line instead:
+--------------:+:--------------+:------------------:+
| Right         | Left          | Centered           |
+---------------+---------------+--------------------+
Grid table foot #####{.unlisted .unnumbered}
A table foot can be defined by enclosing it with separator lines
that use = instead of -:
The syntax is identical to PHP Markdown Extra tables. The beginning and
ending pipe characters are optional, but pipes are required between all
columns. The colons indicate column alignment as shown. The header
cannot be omitted. To simulate a headerless table, include a header
with blank cells.
Since the pipes indicate column boundaries, columns need not be vertically
aligned, as they are in the above example. So, this is a perfectly
legal (though ugly) pipe table:
The cells of pipe tables cannot contain block elements like paragraphs
and lists, and cannot span multiple lines. If any line of the
markdown source is longer than the column width (see --columns),
then the table will take up the full text width and the cell
contents will wrap, with the relative cell widths determined by
the number of dashes in the line separating the table header
from the table body. (For example ---|- would make the first column 3/4
and the second column 1/4 of the full text width.)
On the other hand, if no lines are wider than column width, then
cell contents will not be wrapped, and the cells will be sized
to their contents.
Note: pandoc also recognizes pipe tables of the following
form, as can be produced by Emacs’ orgtbl-mode:
| One | Two   |
|-----+-------|
| my  | table |
| is  | nice  |
The difference is that + is used instead of |. Other orgtbl features
are not supported. In particular, to get non-default column alignment,
you’ll need to add colons as above.
% title
% author(s) (separated by semicolons)
% date
it will be parsed as bibliographic information, not regular text. (It
will be used, for example, in the title of standalone LaTeX or HTML
output.) The block may contain just a title, a title and an author,
or all three elements. If you want to include an author but no
title, or a title and a date but no author, you need a blank line:
%
% Author
% My title
%
% June 15, 2006
The title may occupy multiple lines, but continuation lines must
begin with leading space, thus:
% My title
  on multiple lines
If a document has multiple authors, the authors may be put on
separate lines with leading space, or separated by semicolons, or
both. So, all of the following are equivalent:
% Author One
  Author Two
% Author One;
  Author Two
% Author One;
Author Two
The date must fit on one line.
All three metadata fields may contain standard inline formatting
(italics, links, footnotes, etc.).
Title blocks will always be parsed, but they will affect the output only
when the --standalone (-s) option is chosen. In HTML output, titles
will appear twice: once in the document head — this is the title that
will appear at the top of the window in a browser — and once at the
beginning of the document body. The title in the document head can have
an optional prefix attached (--title-prefix or -T option). The title
in the body appears as an H1 element with class “title”, so it can be
suppressed or reformatted with CSS. If a title prefix is specified with
-T and no title block appears in the document, the title prefix will
be used by itself as the HTML title.
The man page writer extracts a title, man page section number, and
other header and footer information from the title line. The title
is assumed to be the first word on the title line, which may optionally
end with a (single-digit) section number in parentheses. (There should
be no space between the title and the parentheses.) Anything after
this is assumed to be additional footer and header text. A single pipe
character (|) should be used to separate the footer text from the header
text. Thus,
% PANDOC(1)
will yield a man page with the title PANDOC and section 1.
% PANDOC(1) Pandoc User Manuals
will also have “Pandoc User Manuals” in the footer.
% PANDOC(1) Pandoc User Manuals | Version 4.0
will also have “Version 4.0” in the header.
Extension: yaml_metadata_block
A [YAML] metadata block is a valid YAML object, delimited by a line of three
hyphens (---) at the top and a line of three hyphens (---) or three dots
(...) at the bottom. The initial line --- must not be followed by a blank
line. A YAML metadata block may occur anywhere in the document, but if
it is not at the beginning, it must be preceded by a blank line.
Note that, because of the way pandoc concatenates input files
when several are provided, you may also keep the metadata in a
separate YAML file and pass it to pandoc as an argument, along
with your Markdown files:
Just be sure that the YAML file begins with --- and ends with --- or
.... Alternatively, you can use the --metadata-file option. Using
that approach however, you cannot reference content (like footnotes)
from the main markdown input document.
Metadata will be taken from the fields of the YAML object and added to any
existing document metadata. Metadata can contain lists and objects (nested
arbitrarily), but all string scalars will be interpreted as Markdown. Fields
with names ending in an underscore will be ignored by pandoc. (They may be
given a role by external processors.) Field names must not be
interpretable as YAML numbers or boolean values (so, for
example, yes, True, and 15 cannot be used as field names).
A document may contain multiple metadata blocks. If two
metadata blocks attempt to set the same field, the value from
the second block will be taken.
Each metadata block is handled internally as an independent YAML document.
This means, for example, that any YAML anchors defined in a block cannot be
referenced in another block.
When pandoc is used with -t markdown to create a Markdown document,
a YAML metadata block will be produced only if the -s/--standalone
option is used. All of the metadata will appear in a single block
at the beginning of the document.
Note that [YAML] escaping rules must be followed. Thus, for example,
if a title contains a colon, it must be quoted, and if it contains a
backslash escape, then it must be ensured that it is not treated as a
YAML escape sequence. The pipe character (|) can be used to begin
an indented block that will be interpreted literally, without need for
escaping. This form is necessary when the field contains blank lines
or block-level formatting:
---
title:  'This is the title: it contains a colon'
author:
- Author One
- Author Two
keywords: [nothing, nothingness]
abstract: |
  This is the abstract.

  It consists of two paragraphs.
...
The literal block after the | must be indented relative to the
line containing the |. If it is not, the YAML will be invalid
and pandoc will not interpret it as metadata. For an overview
of the complex rules governing YAML, see the Wikipedia entry on
YAML syntax.
Template variables will be set automatically from the metadata. Thus, for
example, in writing HTML, the variable abstract will be set to the HTML
equivalent of the Markdown in the abstract field:
<p>This is the abstract.</p>
<p>It consists of two paragraphs.</p>
Variables can contain arbitrary YAML structures, but the template must match
this structure. The author variable in the default templates expects a
simple list or string, but can be changed to support more complicated
structures. The following combination, for example, would add an affiliation
to the author if one is given:
---
title: The document title
author:
- name: Author One
  affiliation: University of Somewhere
- name: Author Two
  affiliation: University of Nowhere
...
To use the structured authors in the example above, you would need a custom
template:
Raw content to include in the document’s header may be specified
using header-includes; however, it is important to mark up
this content as raw code for a particular output format, using
the raw_attribute extension, or it
will be interpreted as markdown. For example:
Note: the yaml_metadata_block extension works with
commonmark as well as markdown (and it is enabled by default
in gfm and commonmark_x). However, in these formats the
following restrictions apply:
The YAML metadata block must occur at the beginning of the
document (and there can be only one). If multiple files are
given as arguments to pandoc, only the first can be a YAML
metadata block.
The leaf nodes of the YAML structure are parsed in isolation from
each other and from the rest of the document. So, for
example, you can’t use a reference link in these contexts
if the link definition is somewhere else in the document.
Apendice B: Crossref {#sec:apendixB}
This is a demo file for pandoc-crossref. With this filter, you can
cross-reference figures (see [@fig:figure1;@fig:figure2;@fig:figure3]), display
equations (see @eq:eqn1), tables (see [@tbl:table1])
.
For immediate example, see @fig:figure0
{#fig:figure0}
There is also support for code blocks, for example, [@lst:captionAttr;
@lst:tableCaption; @lst:wrappingDiv]
It’s possible to capitalize reference prefixes, like this: [@Fig:figure1].
In case of multiple references, capitalization is determined by first
reference. [@Fig:figure1; @fig:figure2] is capitalized, while [@fig:figure2;
@Fig:figure1] is not.
It is also possible to mix different references, like [@fig:figure1;
@tbl:table1; @lst:captionAttr; @lst:tableCaption; @fig:figure2; @fig:figure3],
which will be grouped in order they are specified. You can even intermix this
with regular citations, although it’s not recommended: [@fig:figure1;
@tbl:table1]
You can also have custom chapter reference labels, like @sec:custlabs
Subfigures are supported, see [@fig:subfigures; @fig:subfigureB]
Figures {.unlisted .unnumbered #sec:sec1}
{#fig:figure1}
{#fig:figure2}
{#fig:figure3}

{#fig:subfigureB}
Subfigures caption
Equations {.unlisted .unnumbered #sec:sec2}
Display equations are labelled and numbered
$$ P_i(x) = \sum_i a_i x^i $$ {#eq:eqn1}
Since 0.1.6.0 those can also appear in the middle of paragraph
$$a x^2 + b x^2 + c = 0$$ {#eq:quadr} like this.
Tables {.unlisted .unnumbered}
First Header
Second Header
Content Cell
Content Cell
Content Cell
Content Cell
: Table example {#tbl:table1}
Table example {.unlisted .unnumbered}
Table without caption:
First Header
Second Header
Content Cell
Content Cell
Content Cell
Content Cell
Code blocks {.unlisted .unnumbered}
There are a couple options for code block labels. Those work only if code block id starts with lst:, e.g. {#lst:label}
Enabled with codeBlockCaptions metadata option. If code block is immediately
adjacent to paragraph, starting with Listing: or : , said paragraph will
be treated as code block caption.
Listing: Listing caption
main :: IO ()
main = putStrLn "Hello World!"
Wrapping div {.unlisted .unnumbered}
Wrapping code block without label in a div with id lst:... and class, starting with listing, and adding paragraph before code block, but inside div, will treat said paragraph as code block caption.
Listing caption
“`{.haskell}
main :: IO ()
main = putStrLn “Hello World!”
“`
Unnumbered chapter. {.unlisted .unnumbered}
This chapter doesn’t change chapter prefix of referenced elements, instead keeping number of previous chapter, e.g.
$$ S(x) = \int_{x_1}^{x_2} a x+b \ \mathrm{d}x $$ {#eq:eqn2}
Reference lists {.unlisted .unnumbered}
It’s also possible to show lists of figures and tables, like this:
\listoffigures
\listoftables
\listoflistings
Footnotes
Conseguir una instalación funcional de pandoc y sus dependencias es
condicionante el sistema en el que se ejecute. Las rutinas proveidas estan
destinadas a sistemas Arch Linux. Para instrucciones especificas consultar las
indicaciones de su autor @installPandoc. ↩
El contenido de los apéndices se encuentran en su idioma original. ↩
The point of this rule is to ensure that normal paragraphs
starting with people’s initials, like
B. Russell was an English philosopher.
do not get treated as list items.
This rule will not prevent
(C) 2007 Joe Smith
from being interpreted as a list item. In this case, a backslash
escape can be used:
This repository contains a .NET Worker Windows Service implementation using BackgroundService. The service performs background tasks and demonstrates how to create a long-running service in a Windows environment by logging Computer Programming Jokes.
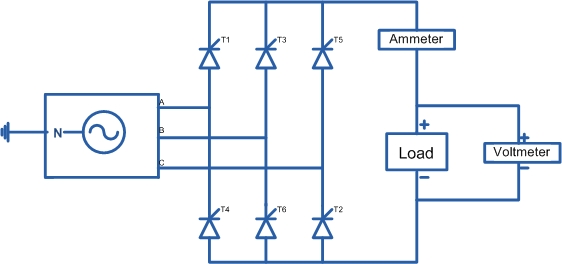
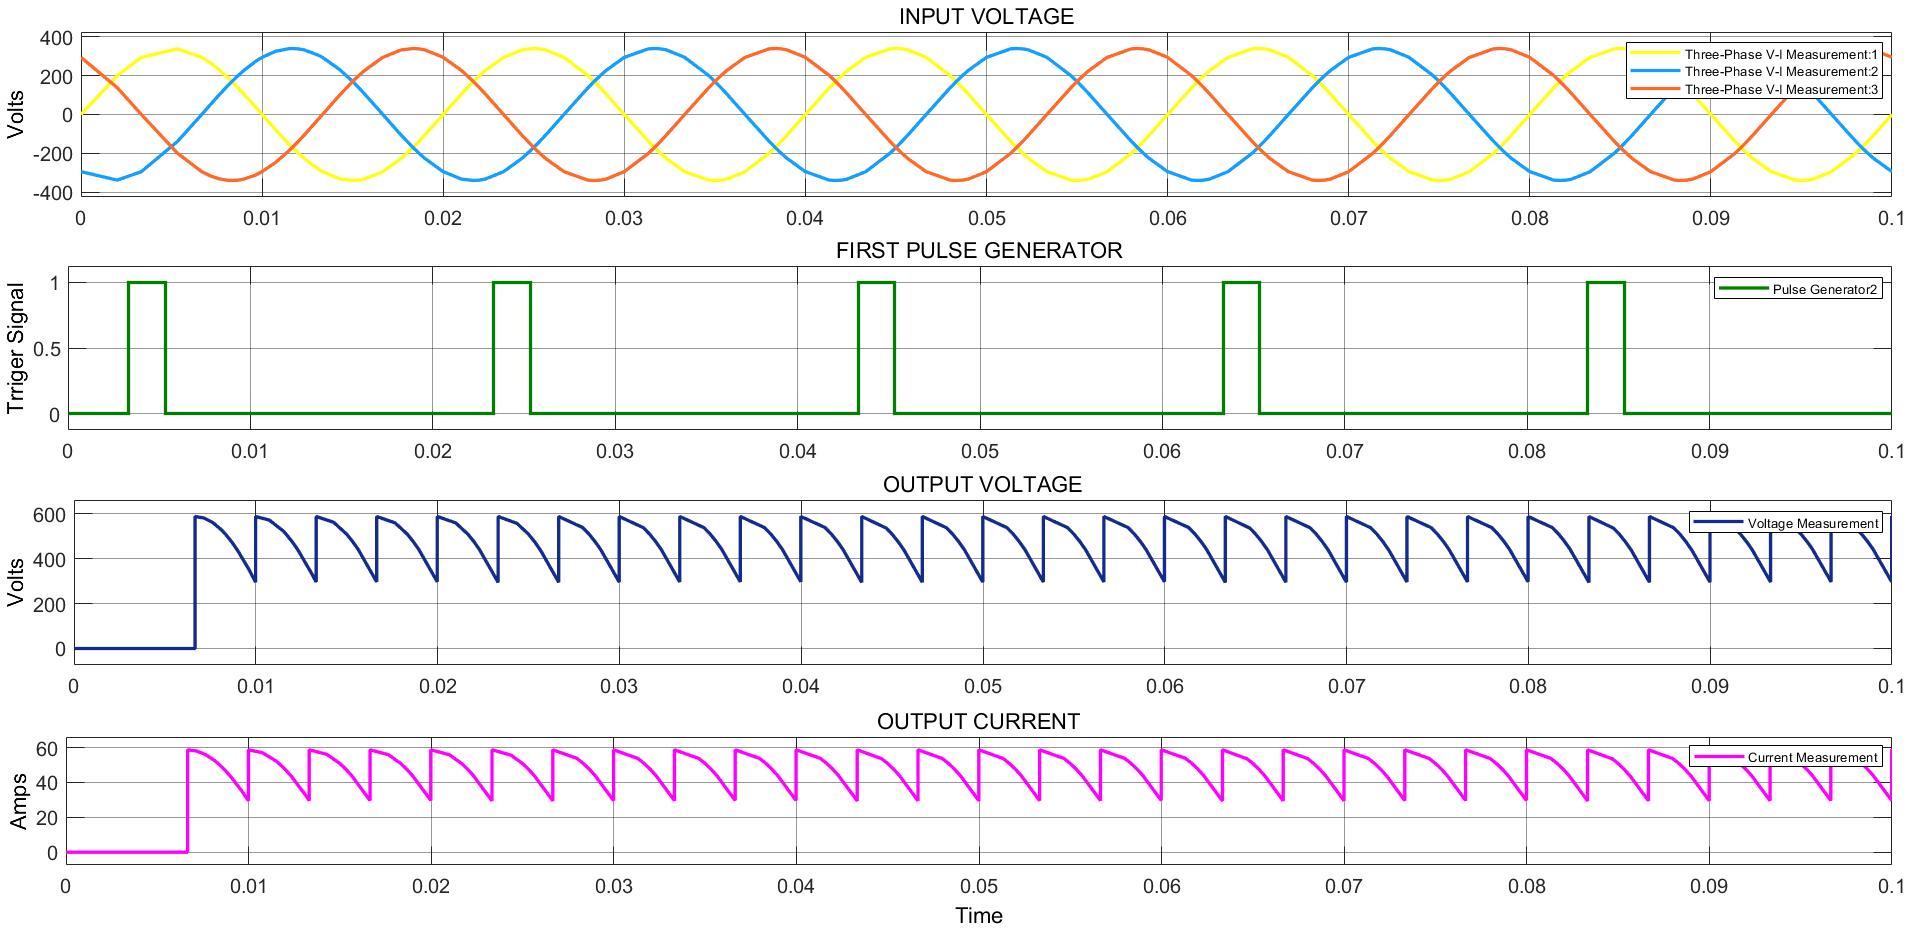
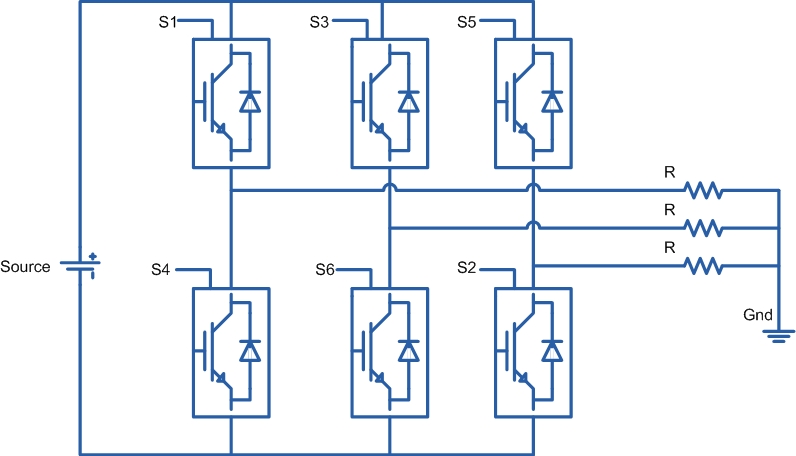
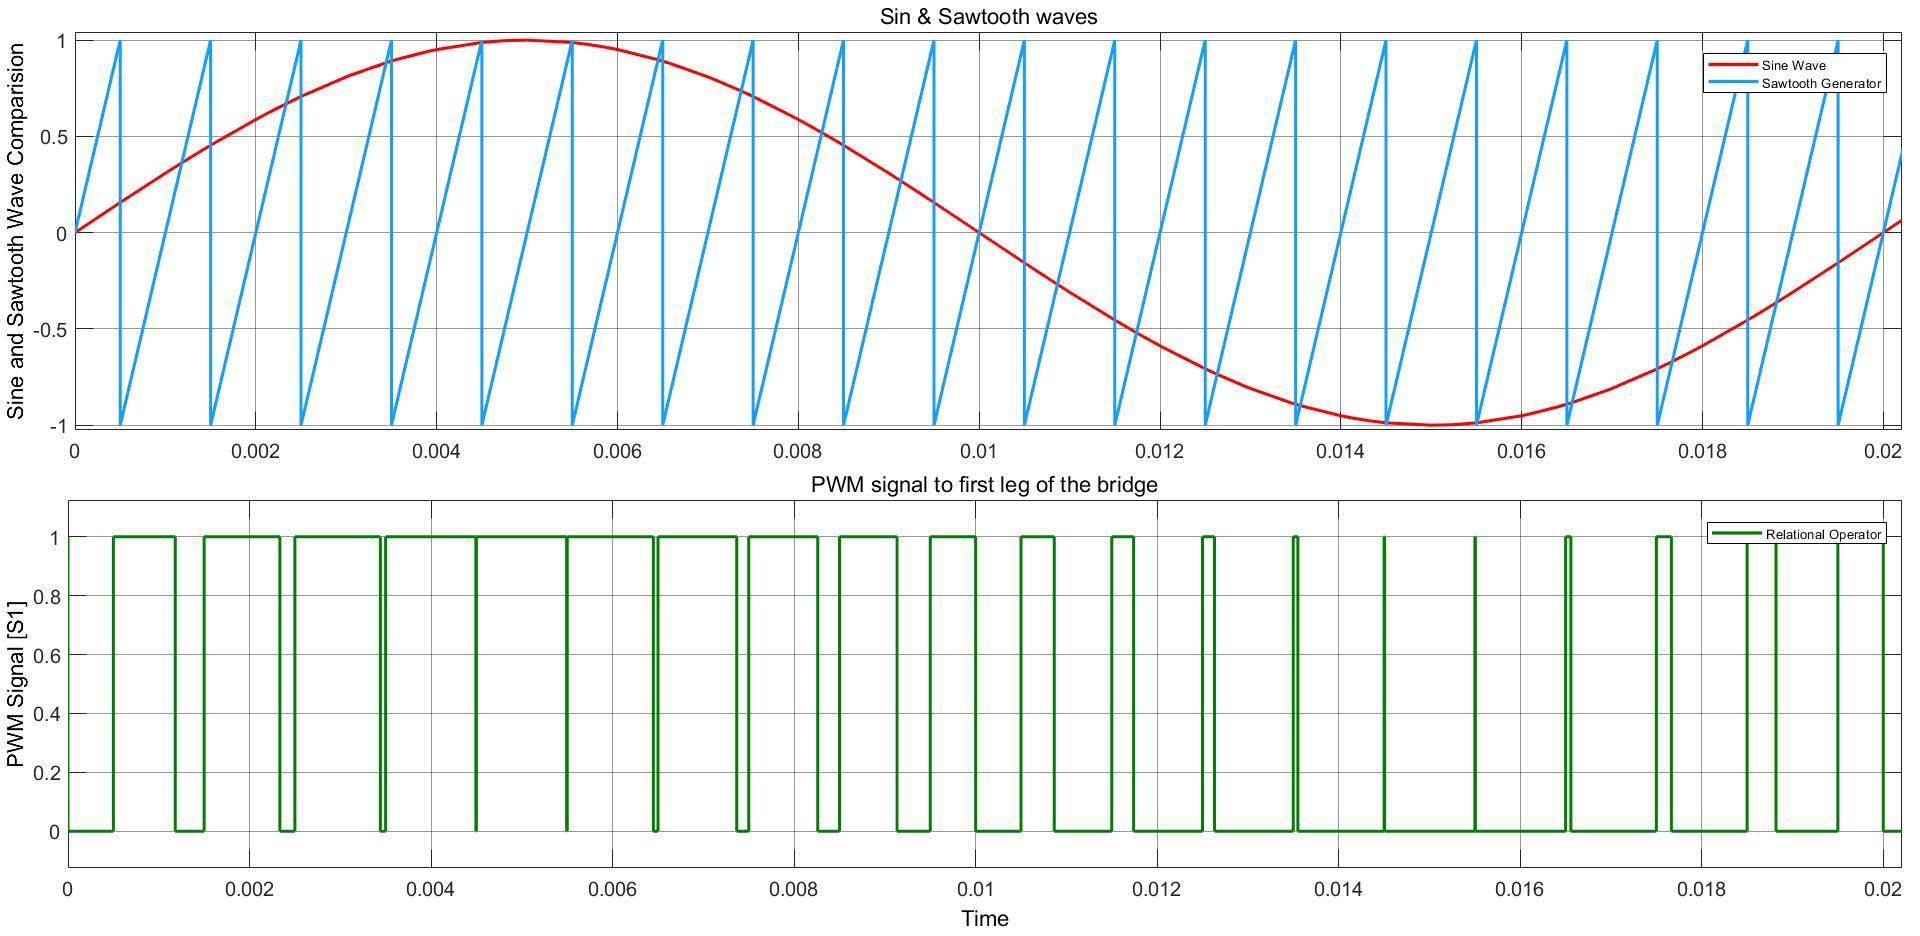
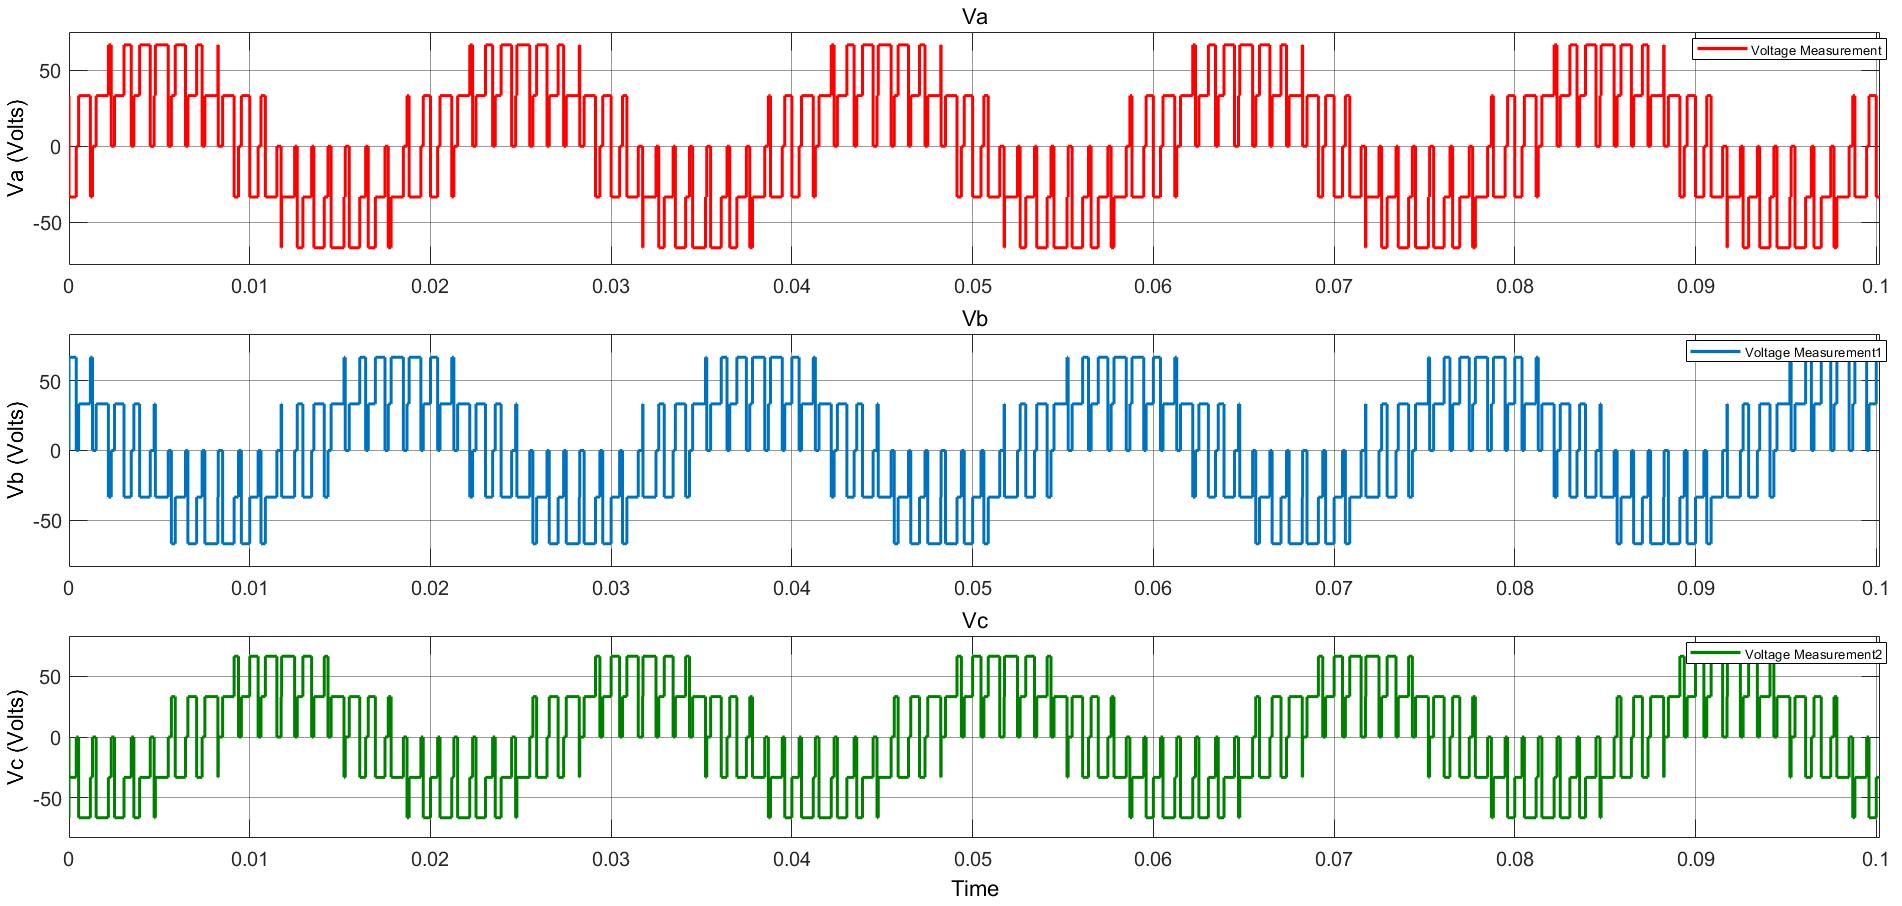
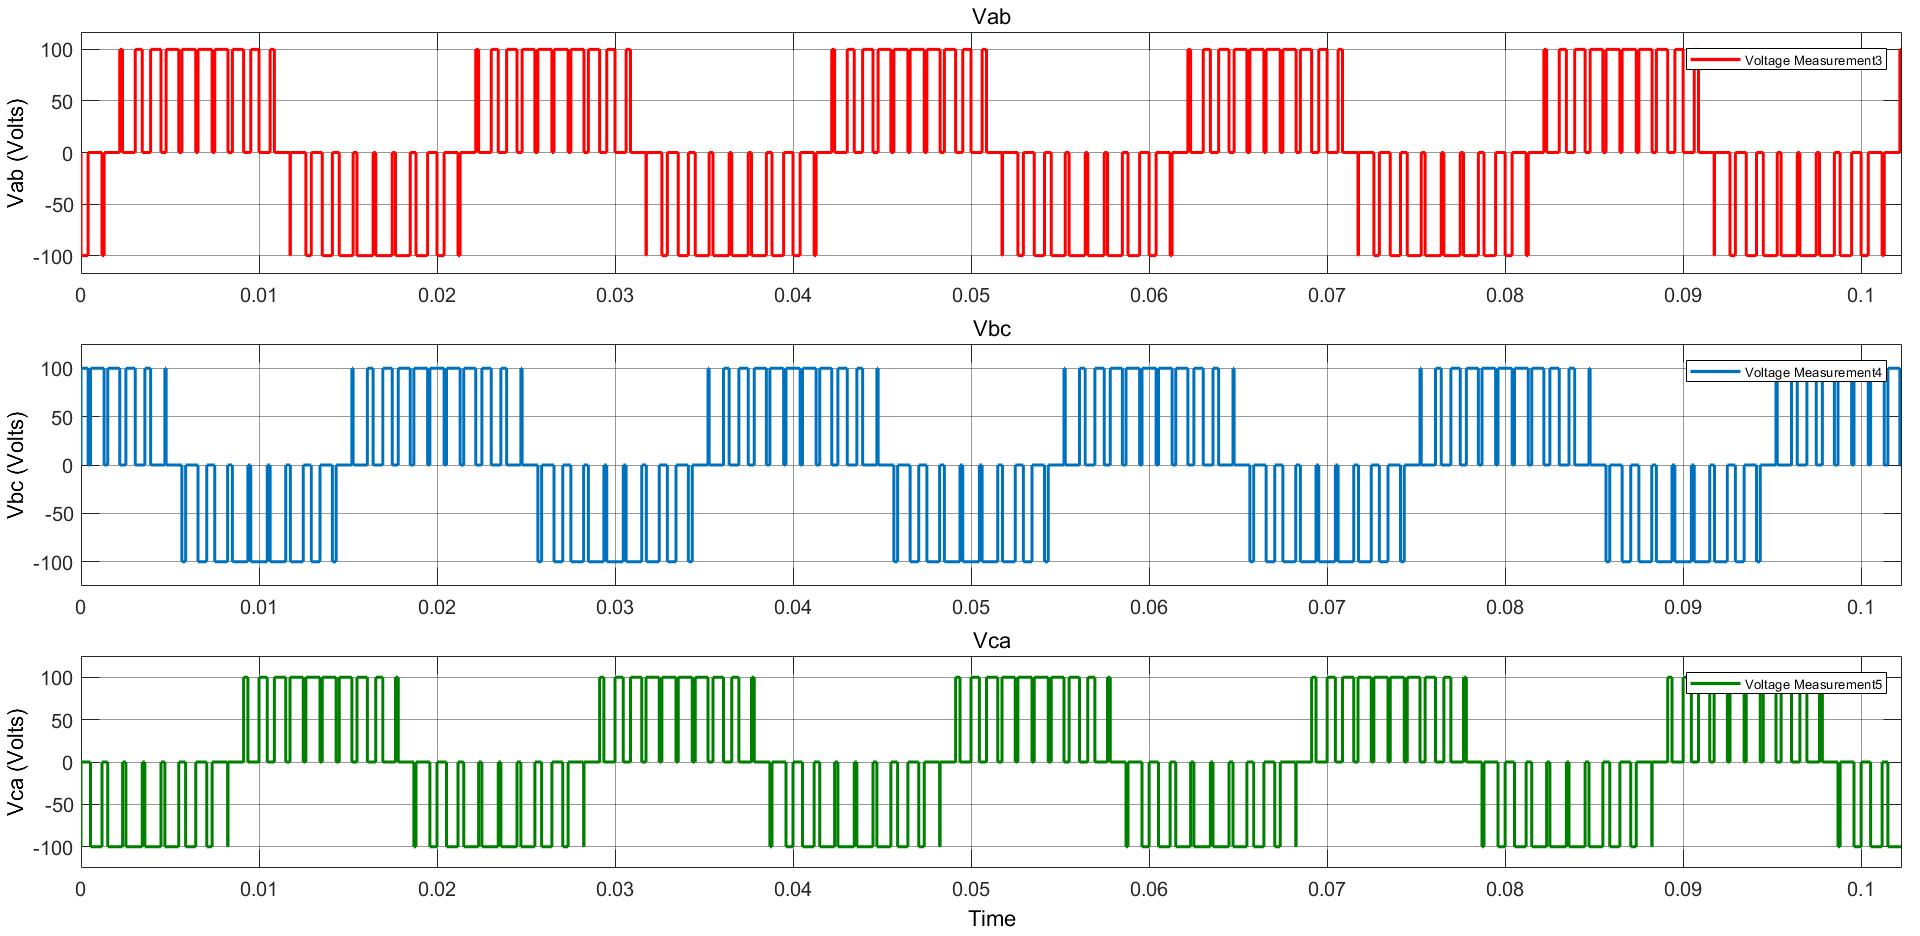
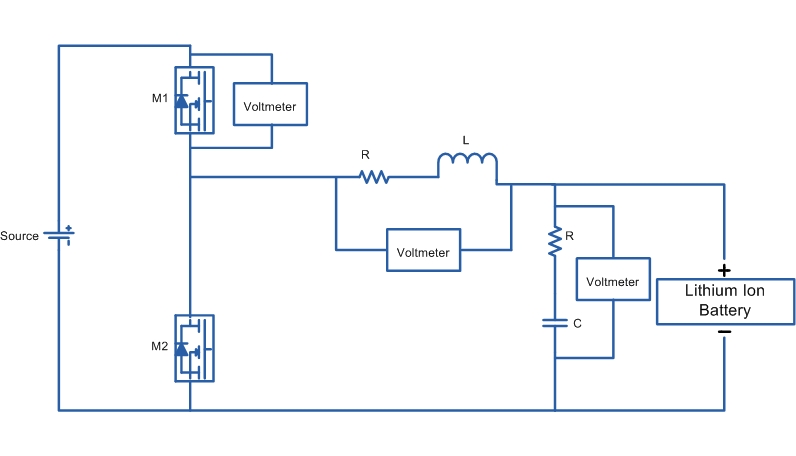
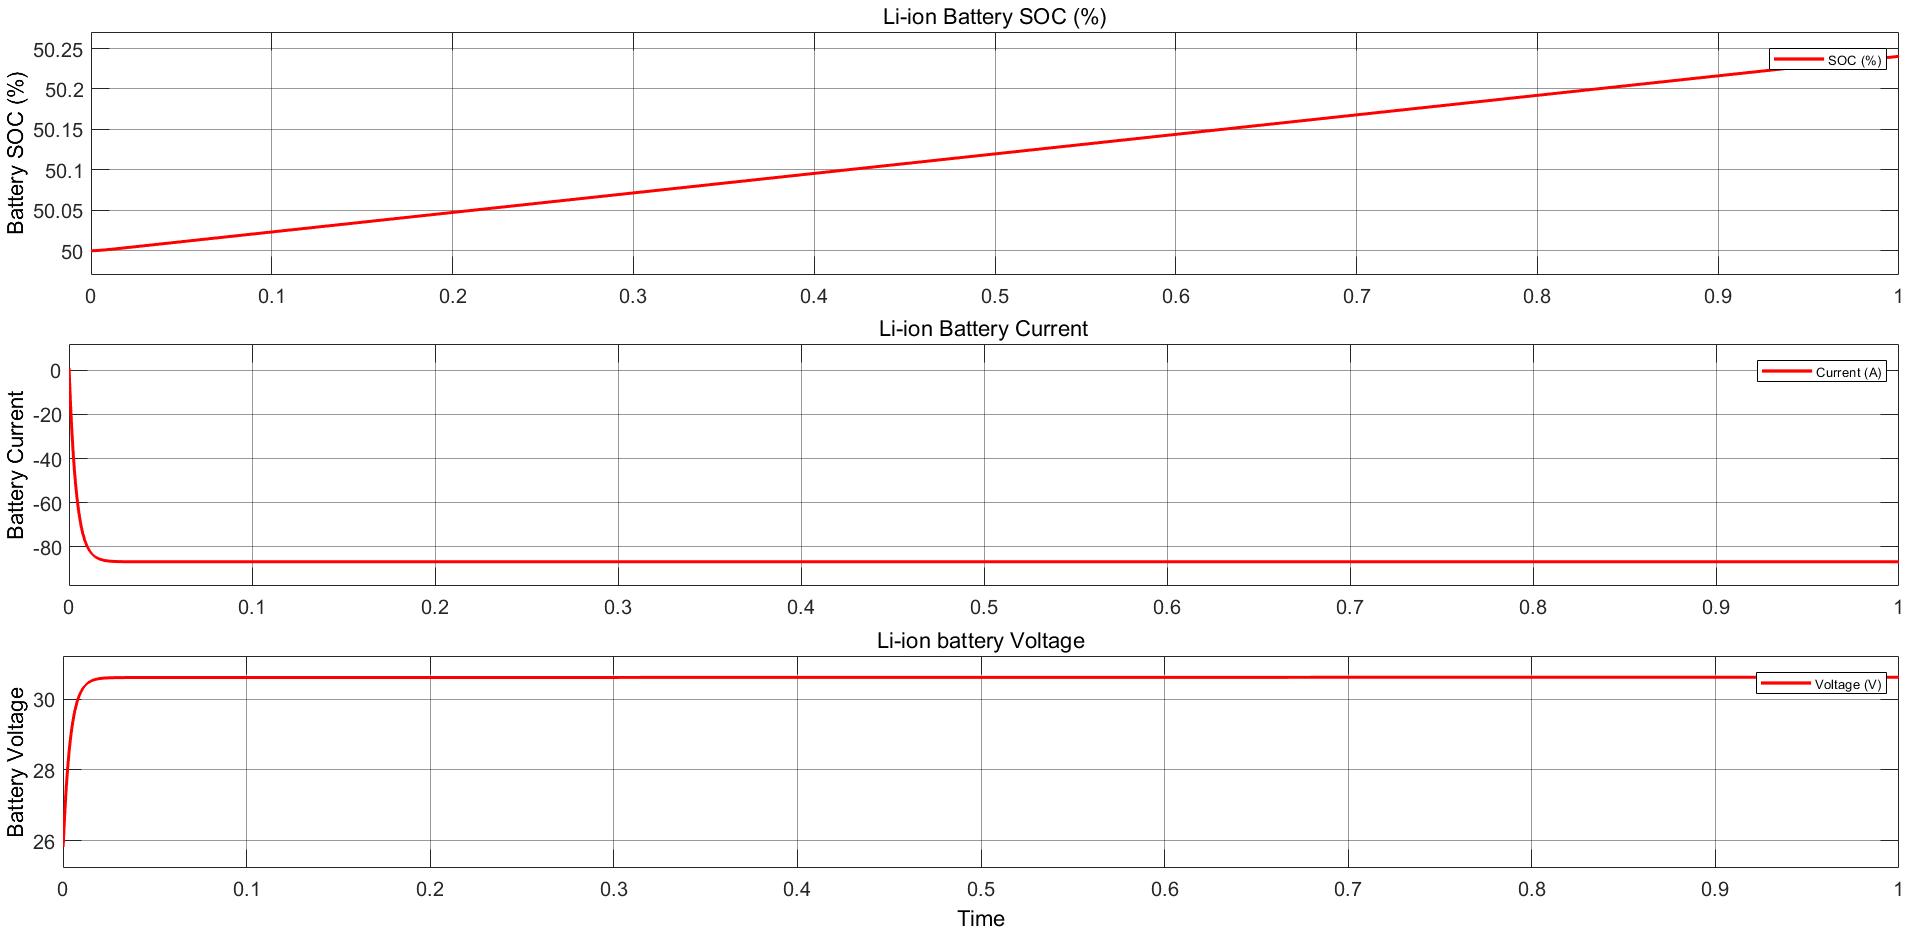
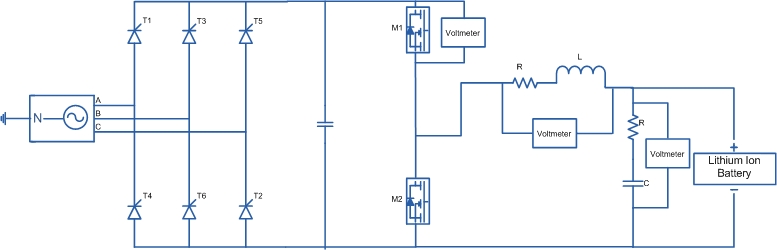
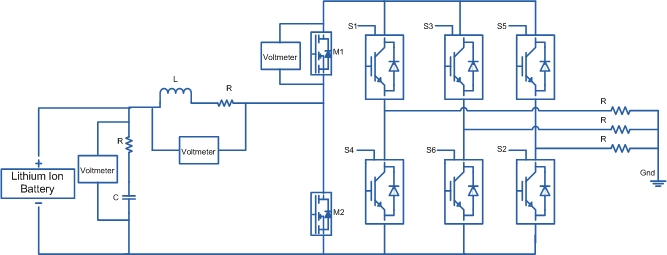
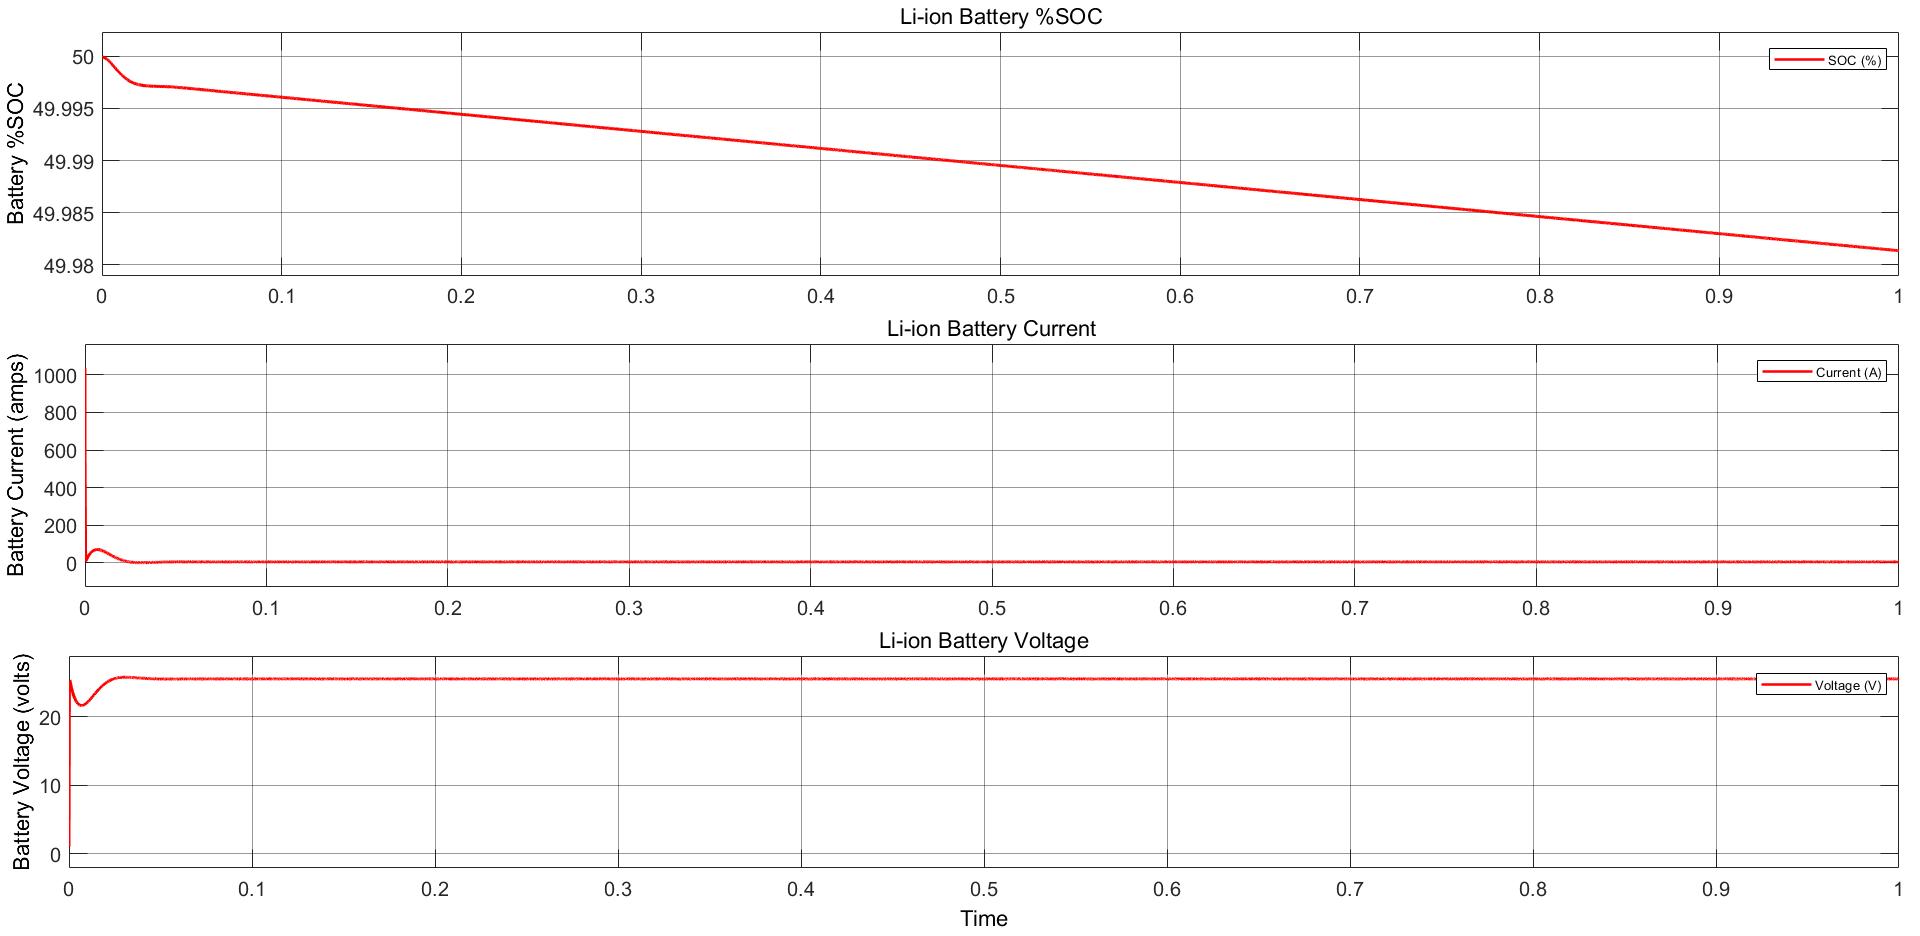
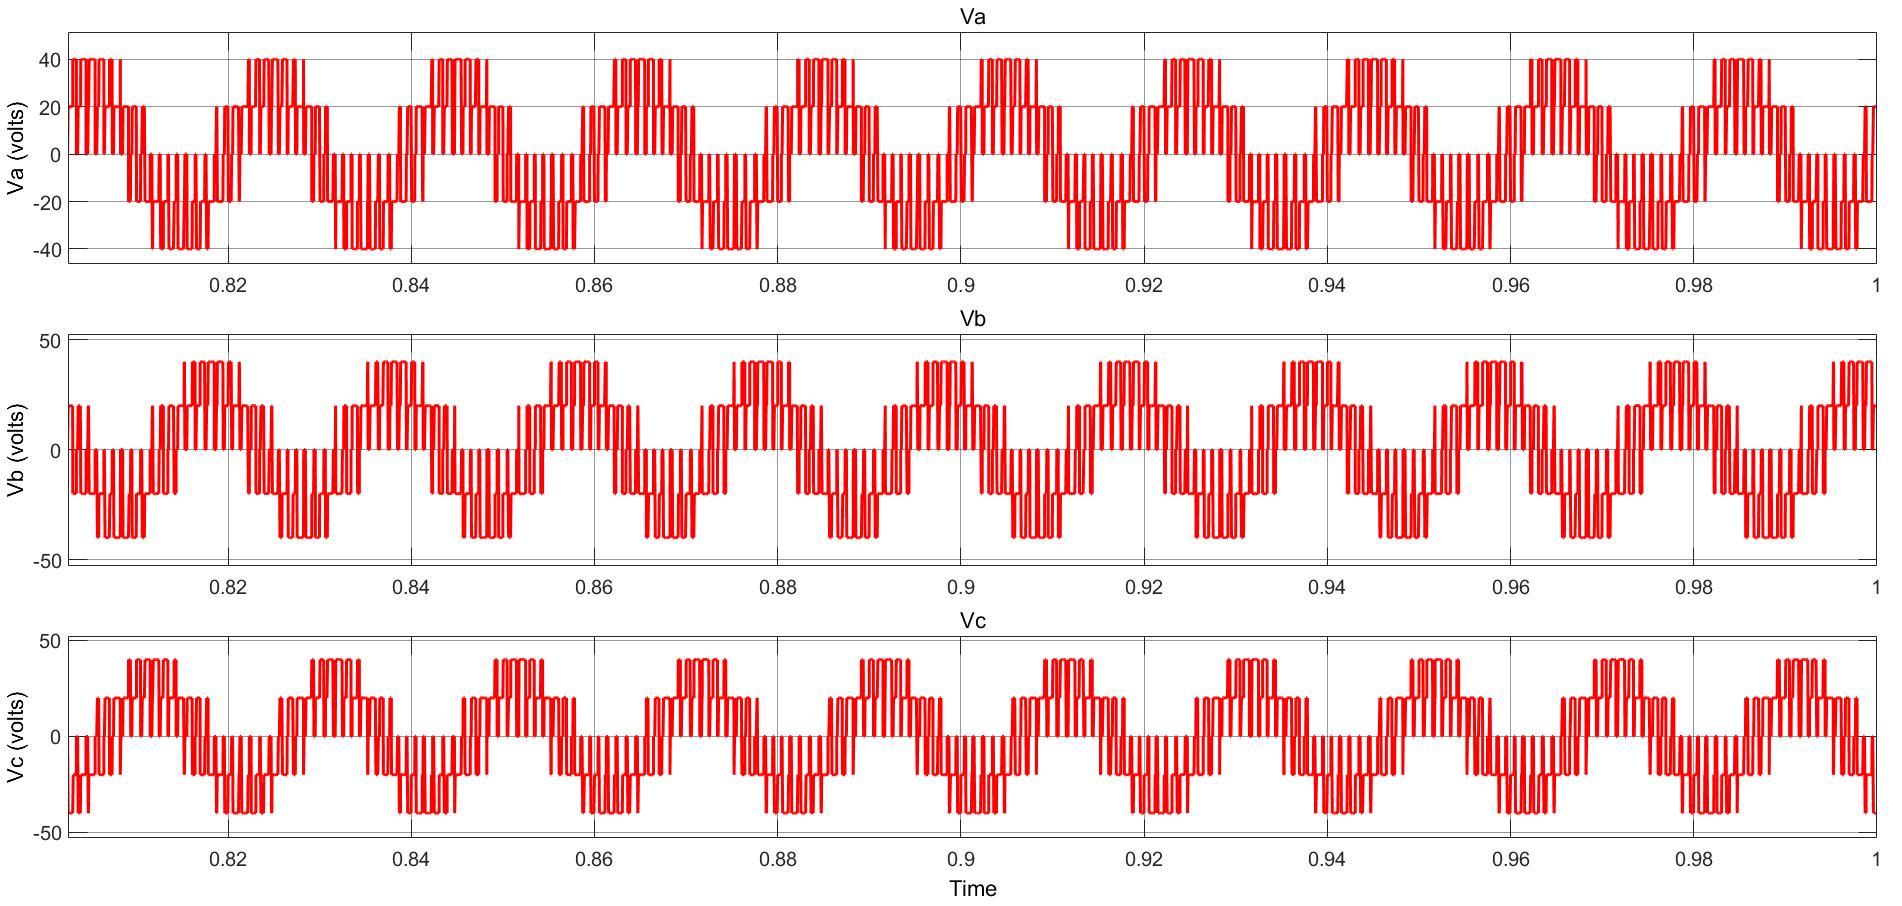
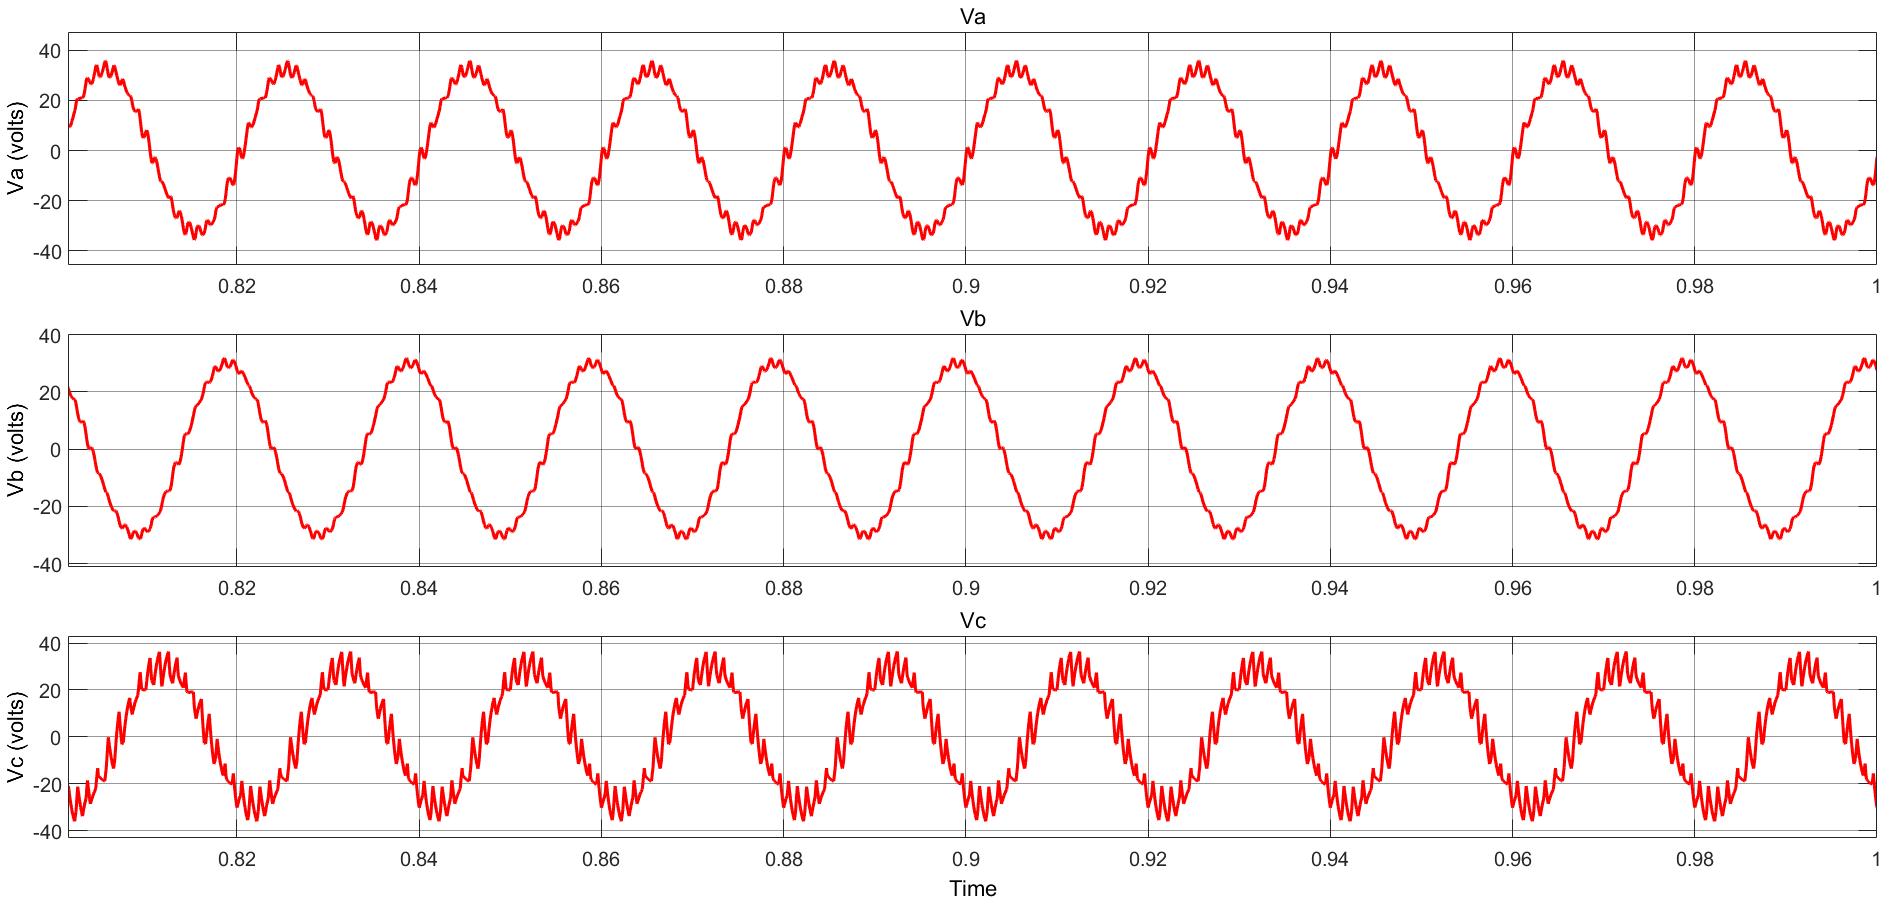
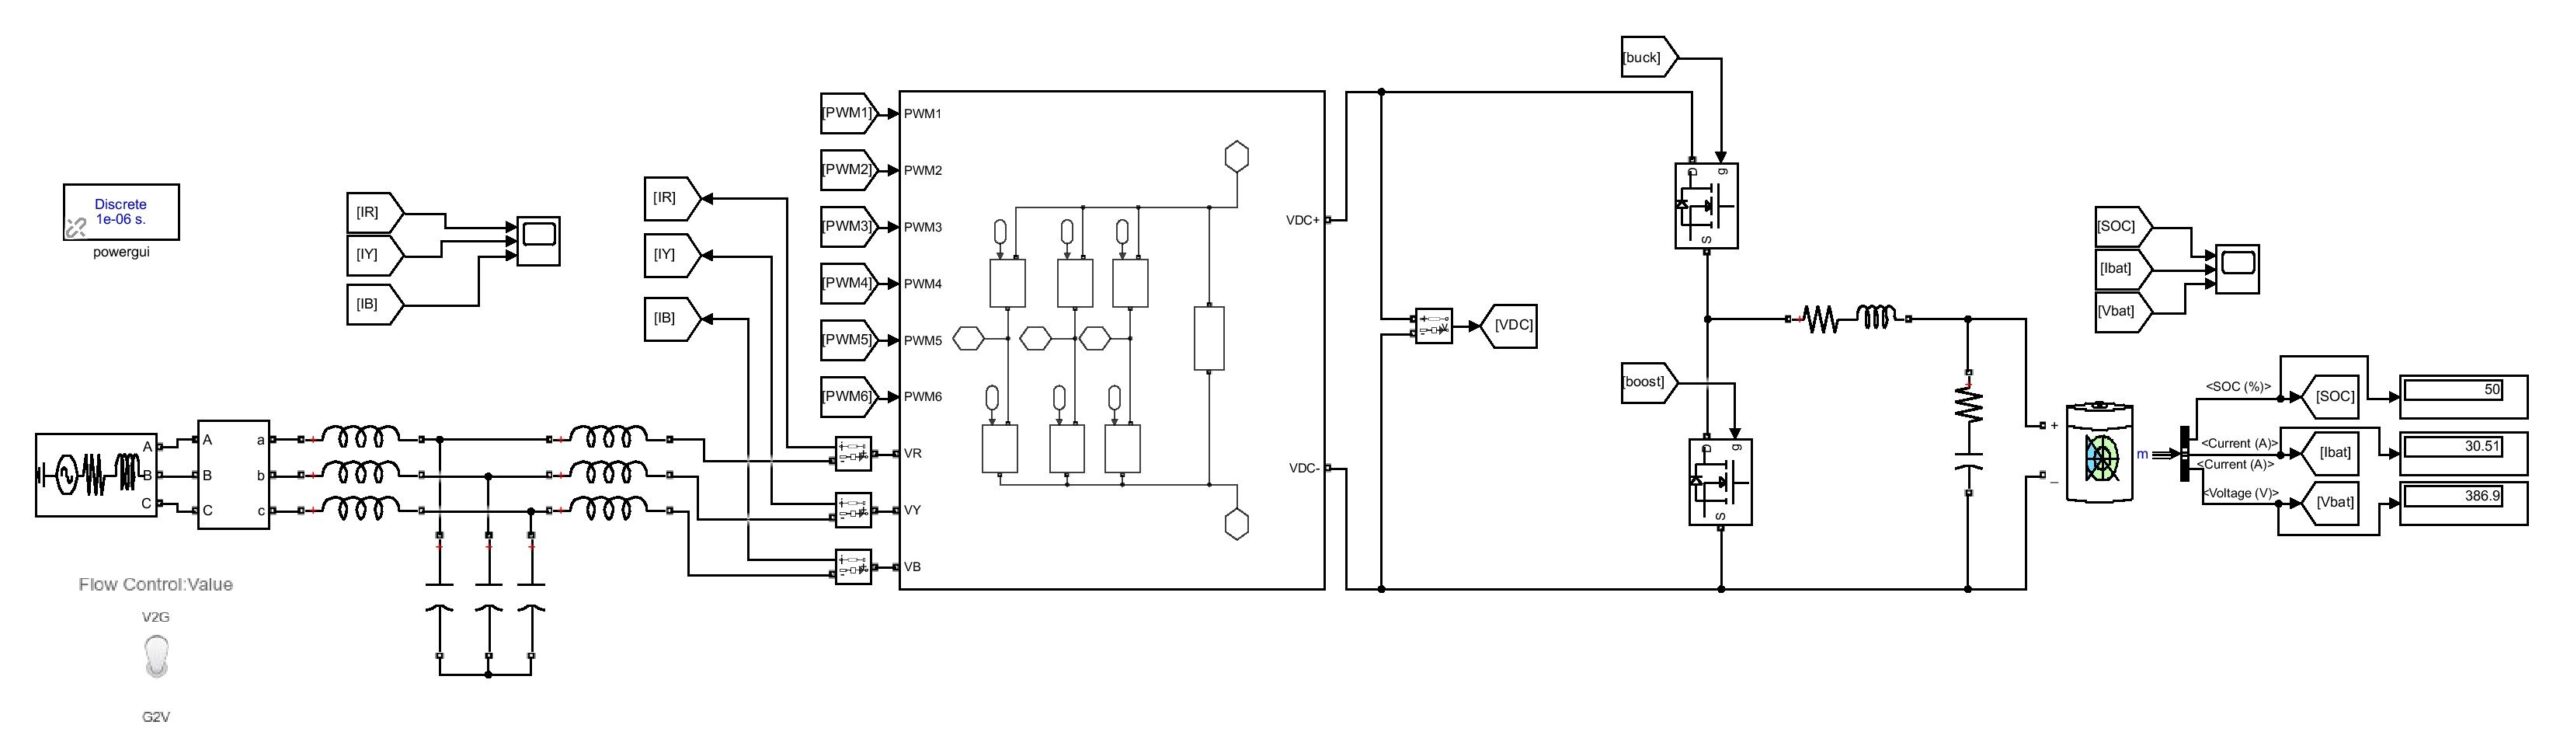
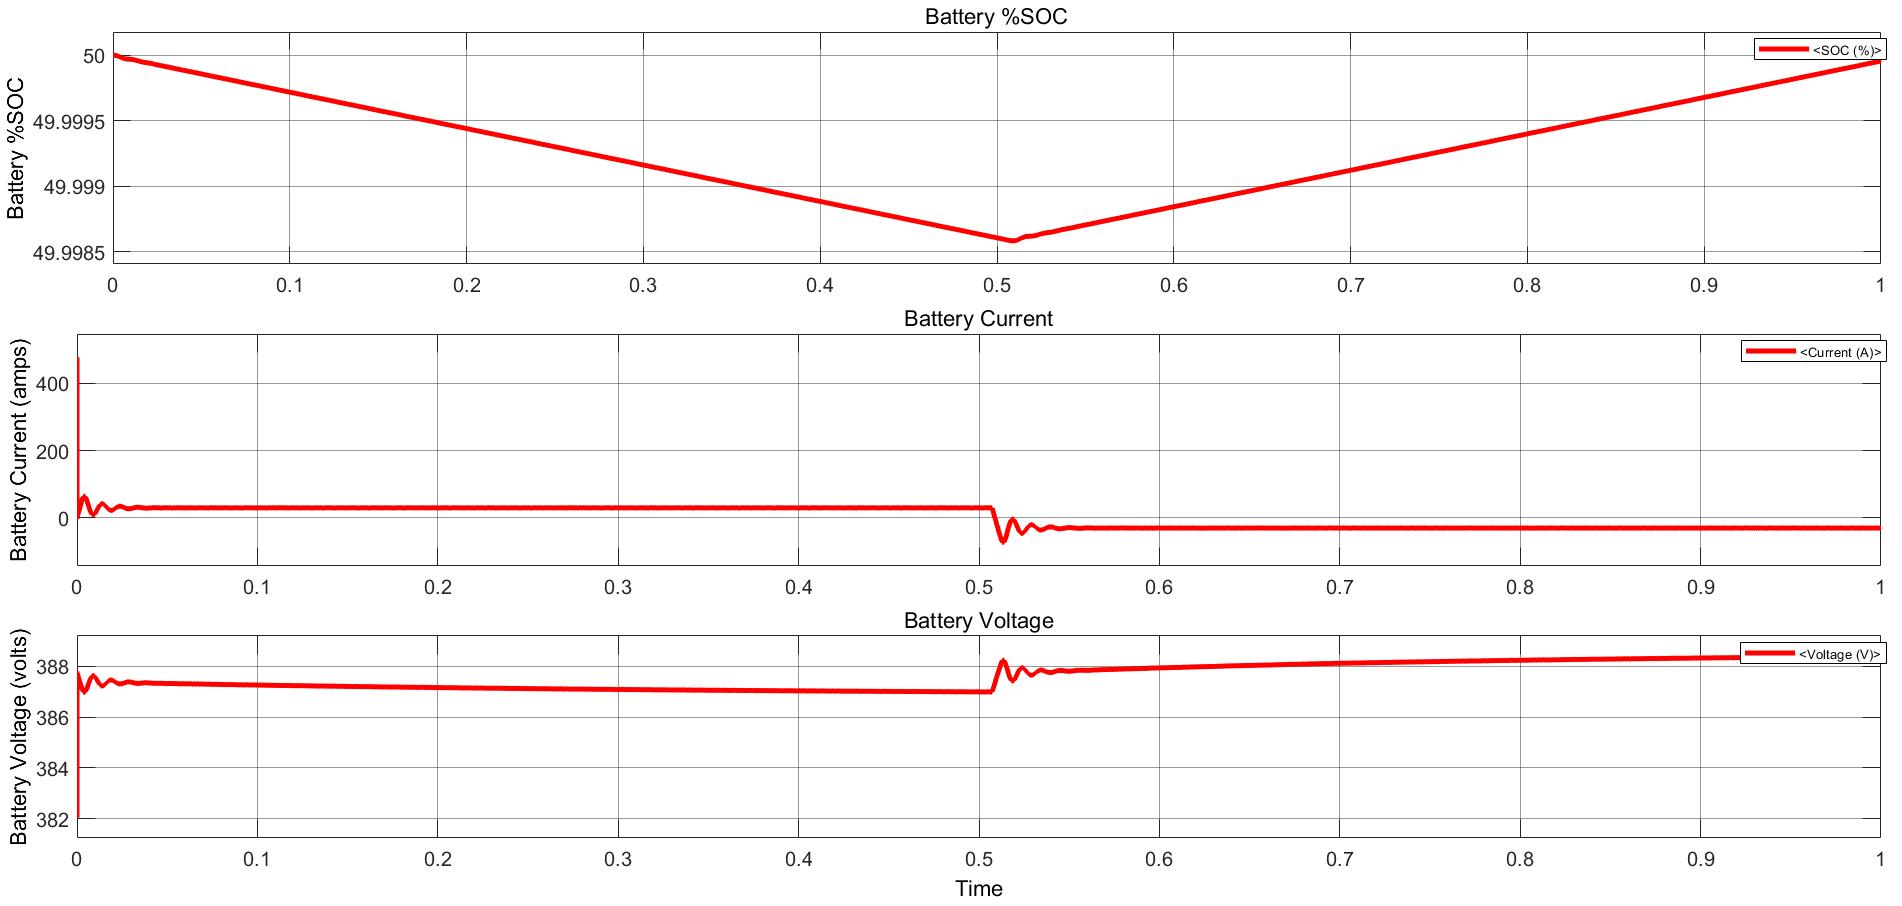
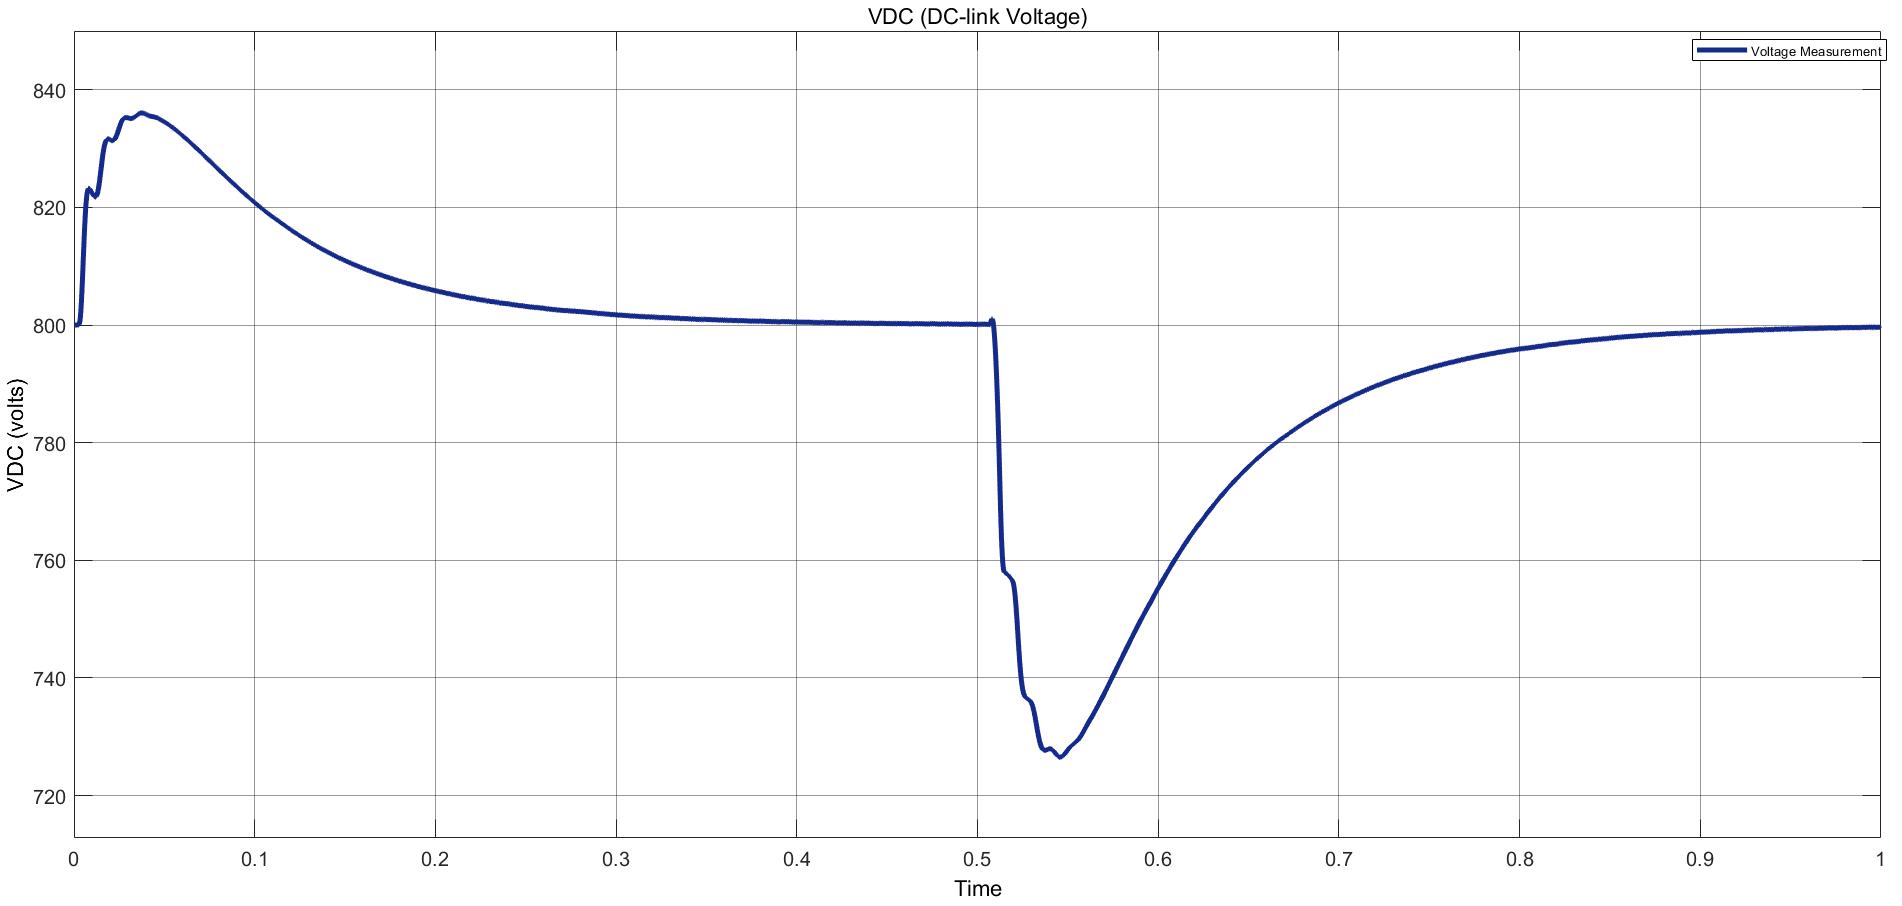
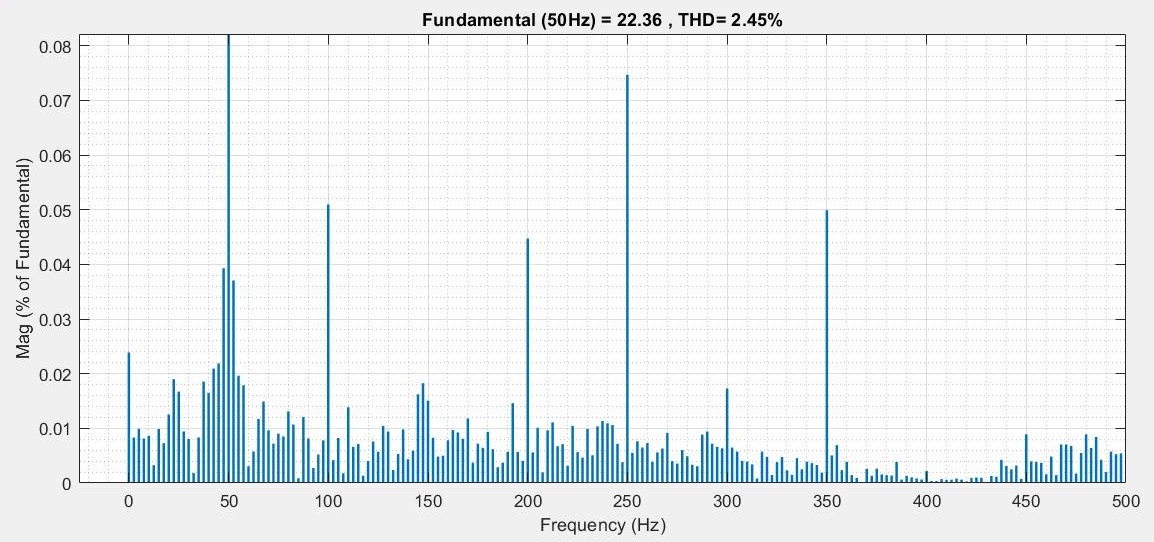
Power Converter Topologies for Vehicle-to-Grid (V2G) and Grid-to-Vehicle (G2V) Technologies
The objective of this project is to design and implement power converter topologies for bi-direction power flow in V2G (Vehicle to Grid) and G2V (Grid to Vehicle) technologies. It will support both the grid (in place) and traction (vehicle) with added auxiliary loads, Also by controlling bidirectional charging and discharging services of battery efficiently, it can further make it more suitable for renewable energy integration. A better solution where the battery system can be used to support the services, wherein the battery is still part of the source.
This project provides a detailed technical assessment, with various power electronics topologies, modeling and control strategies designed in terms of harmonics and dynamic response.
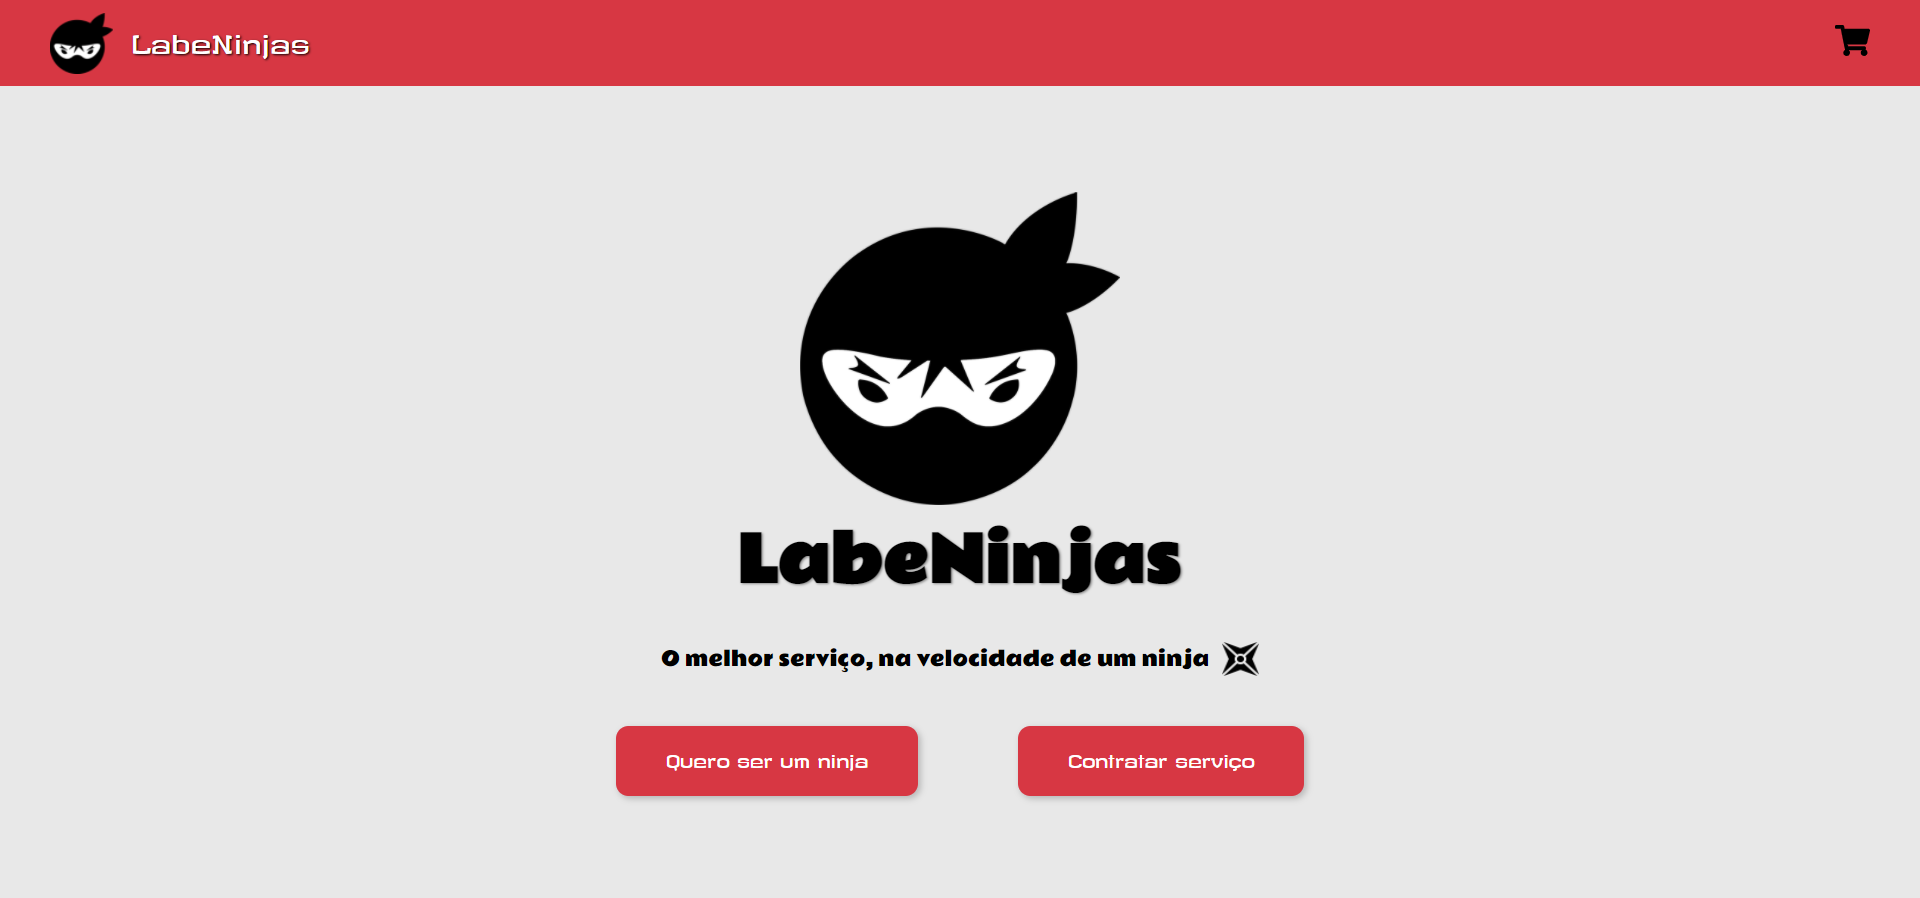
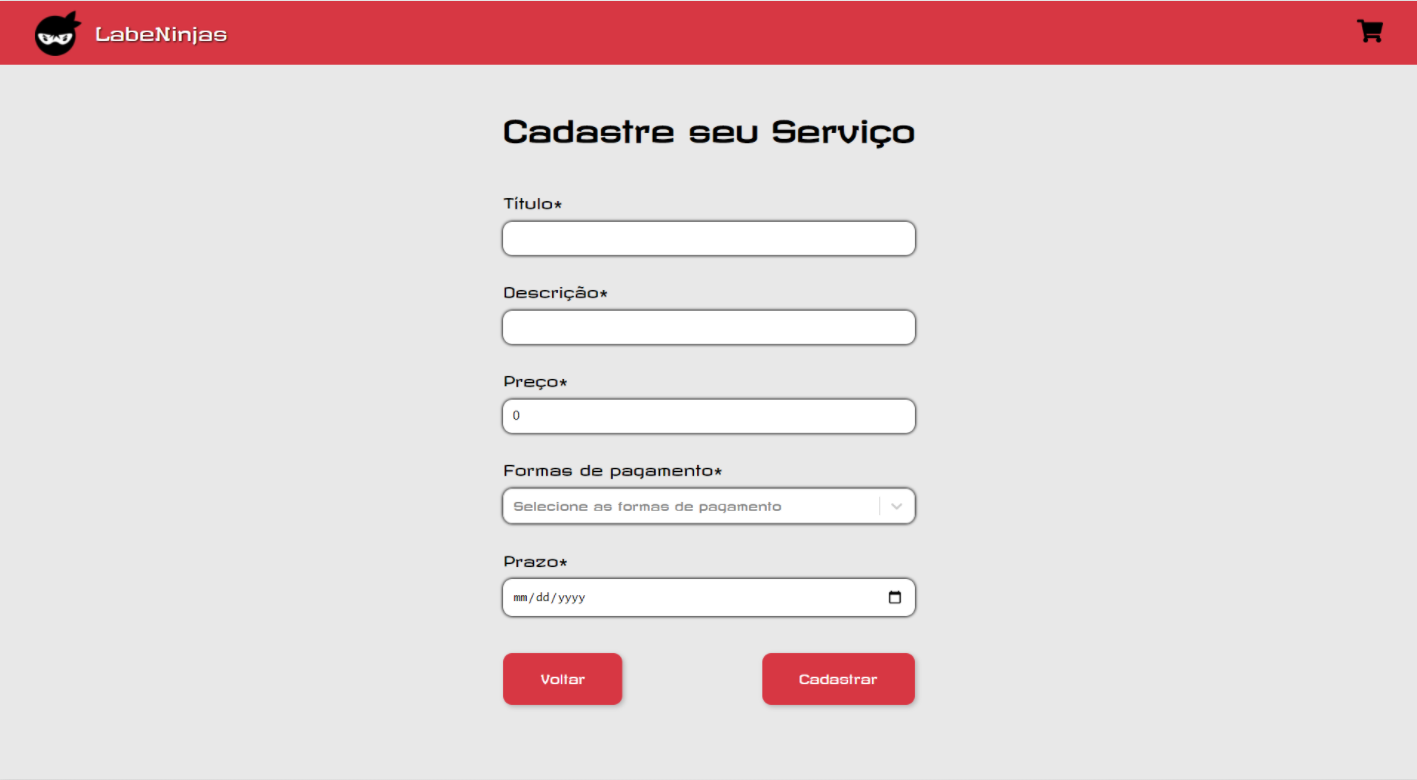
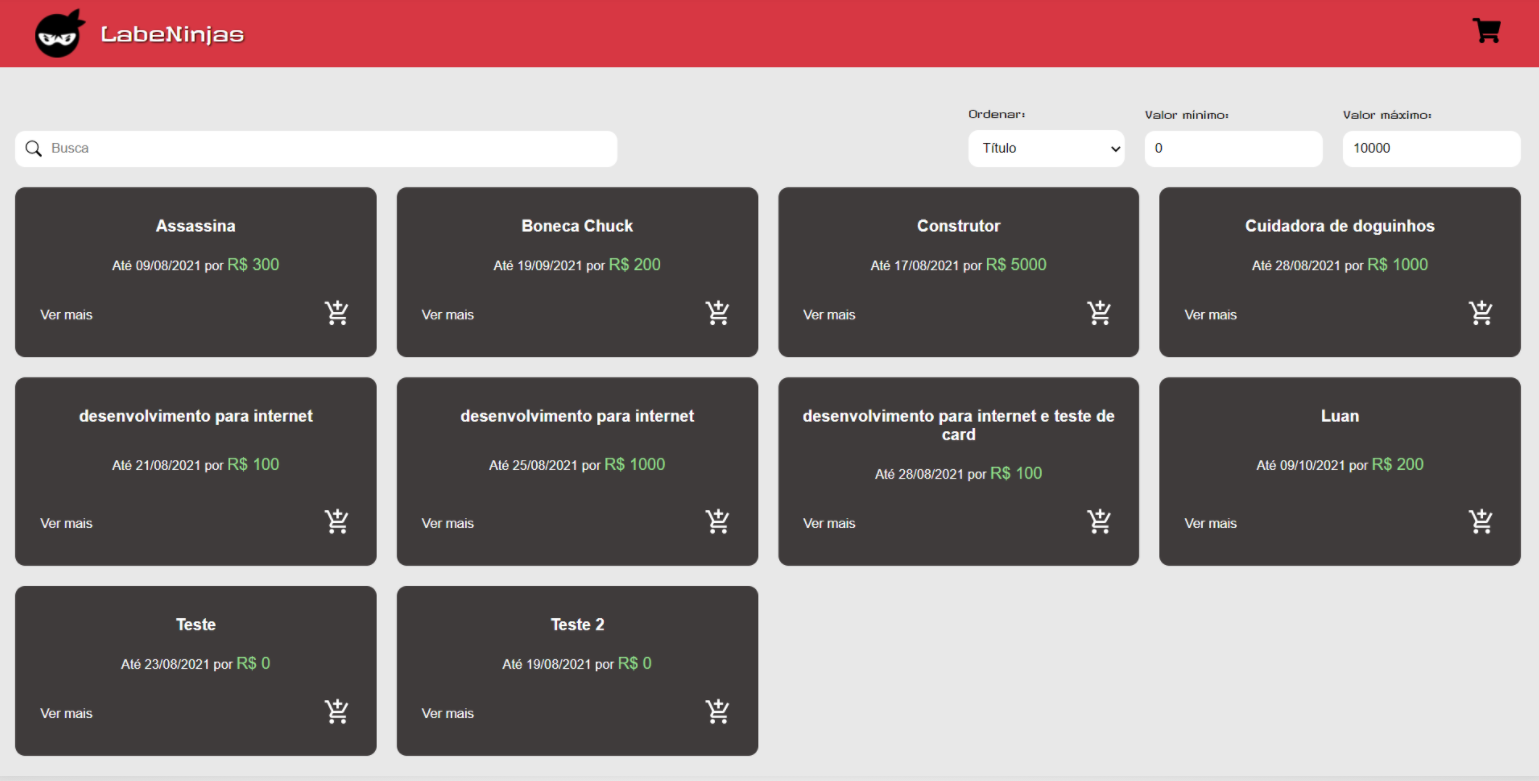
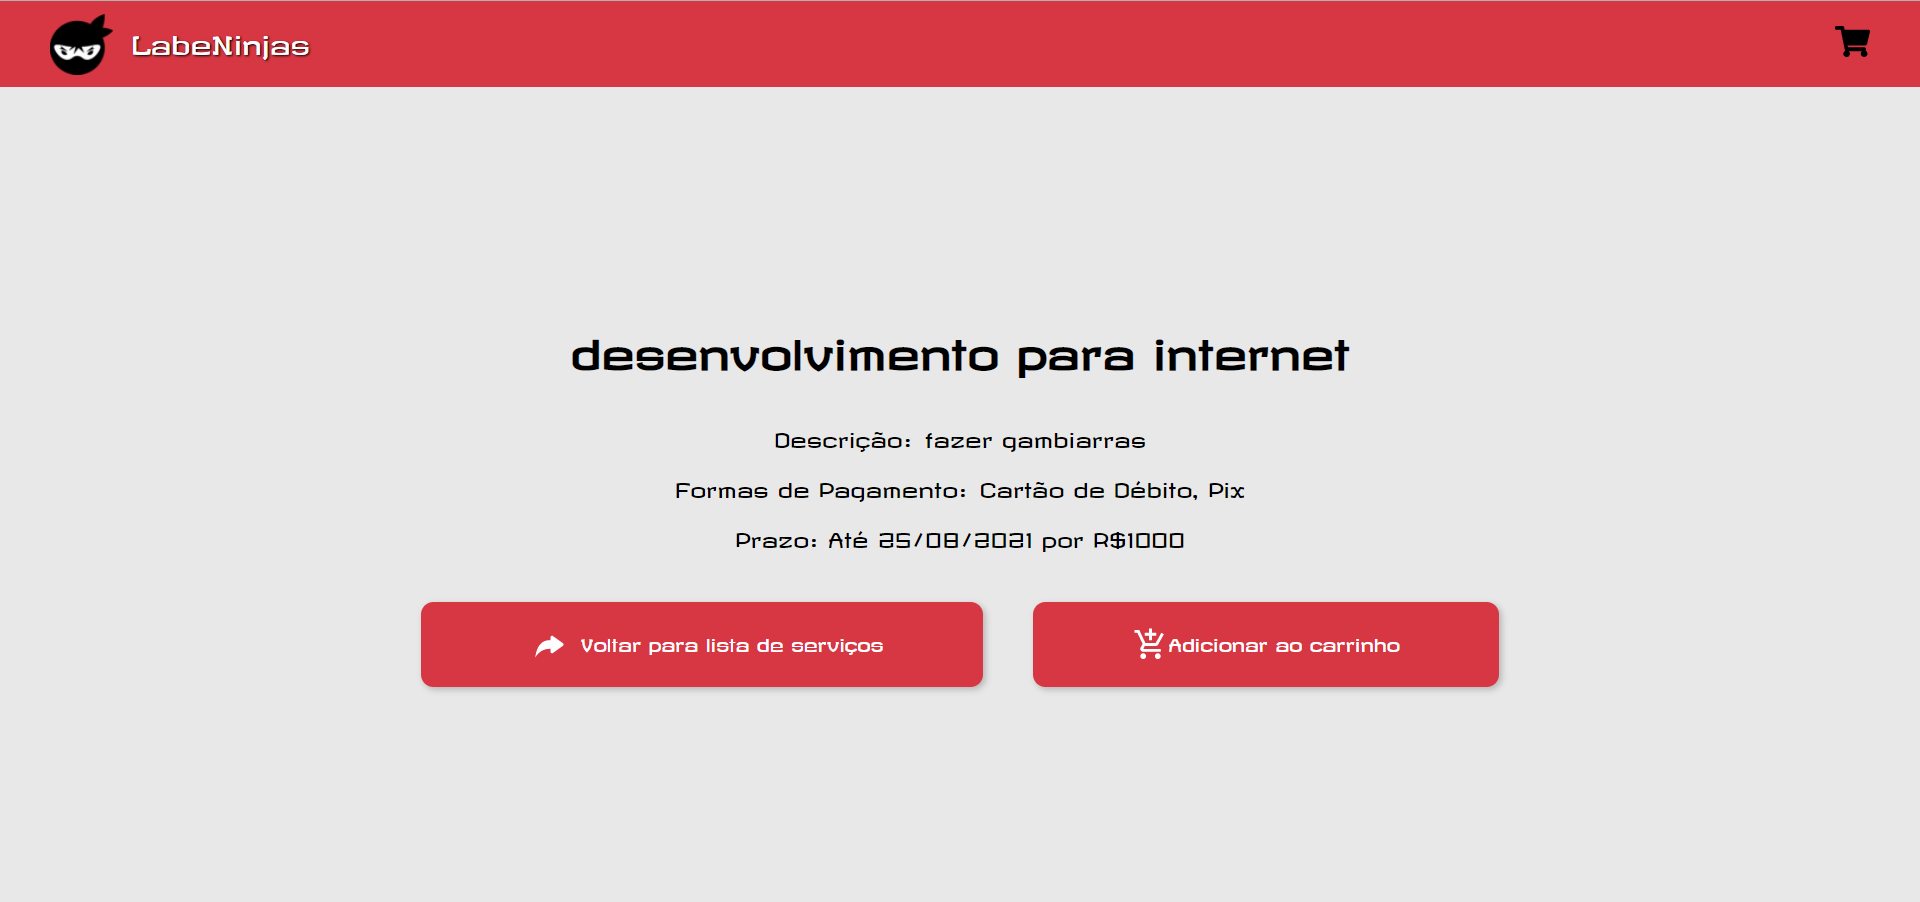
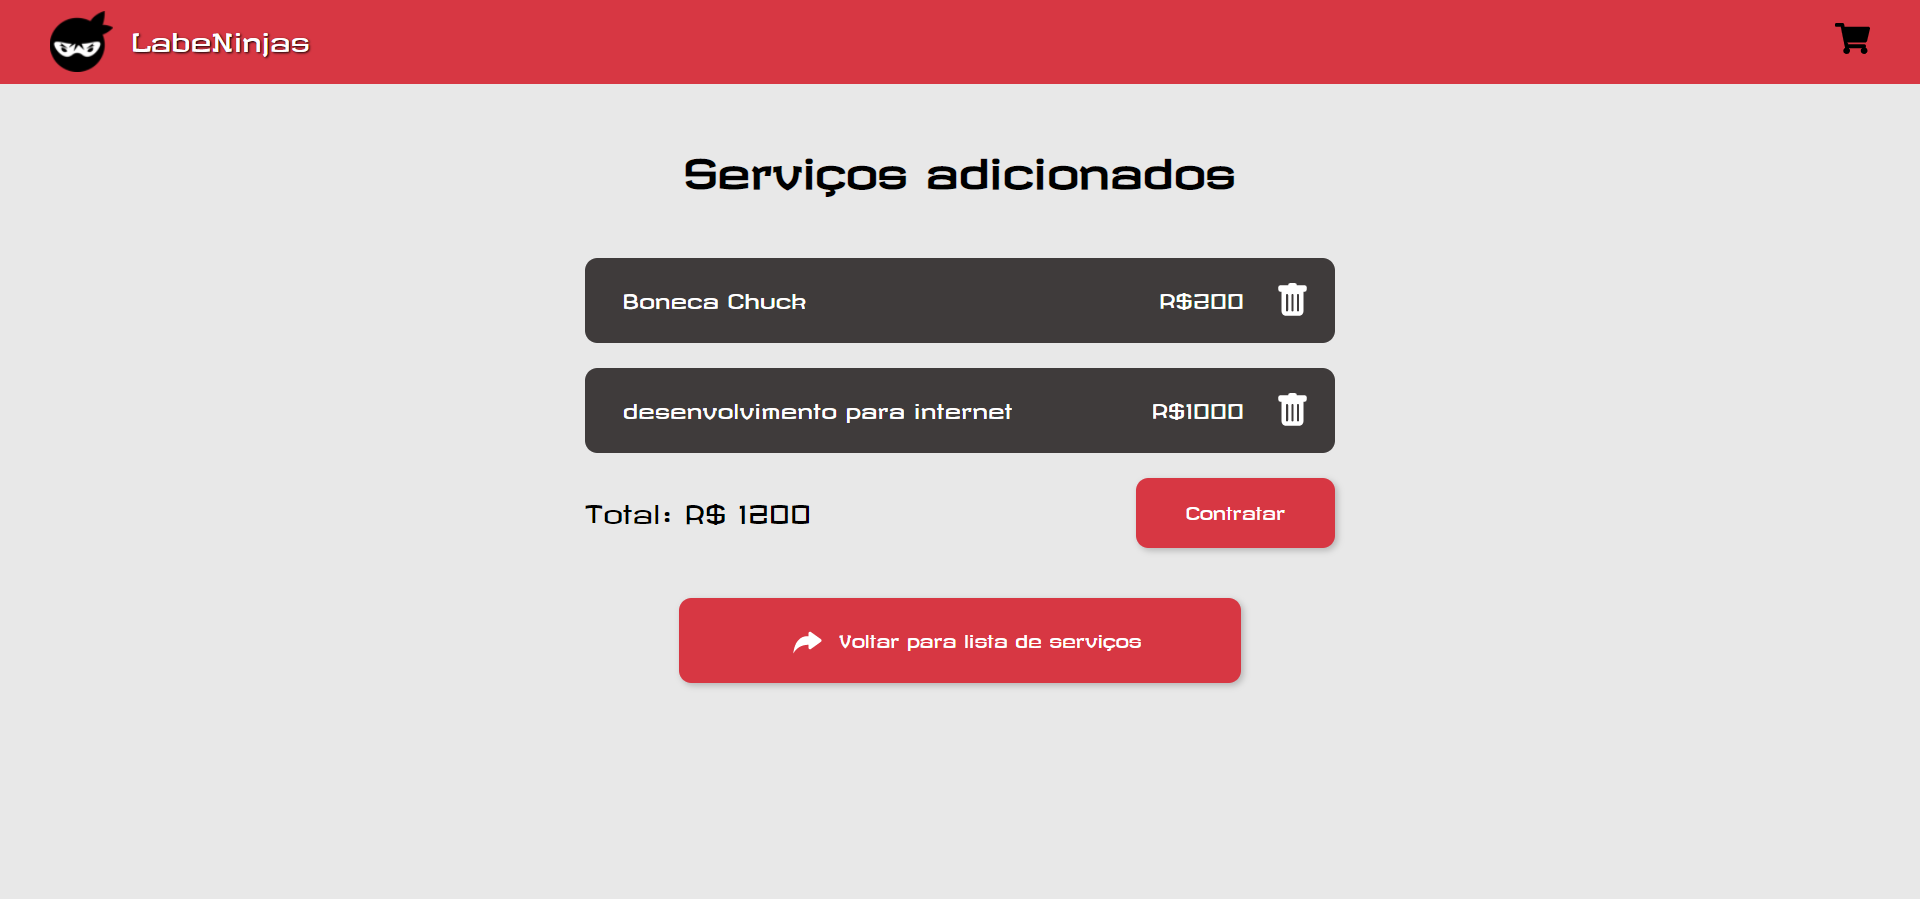
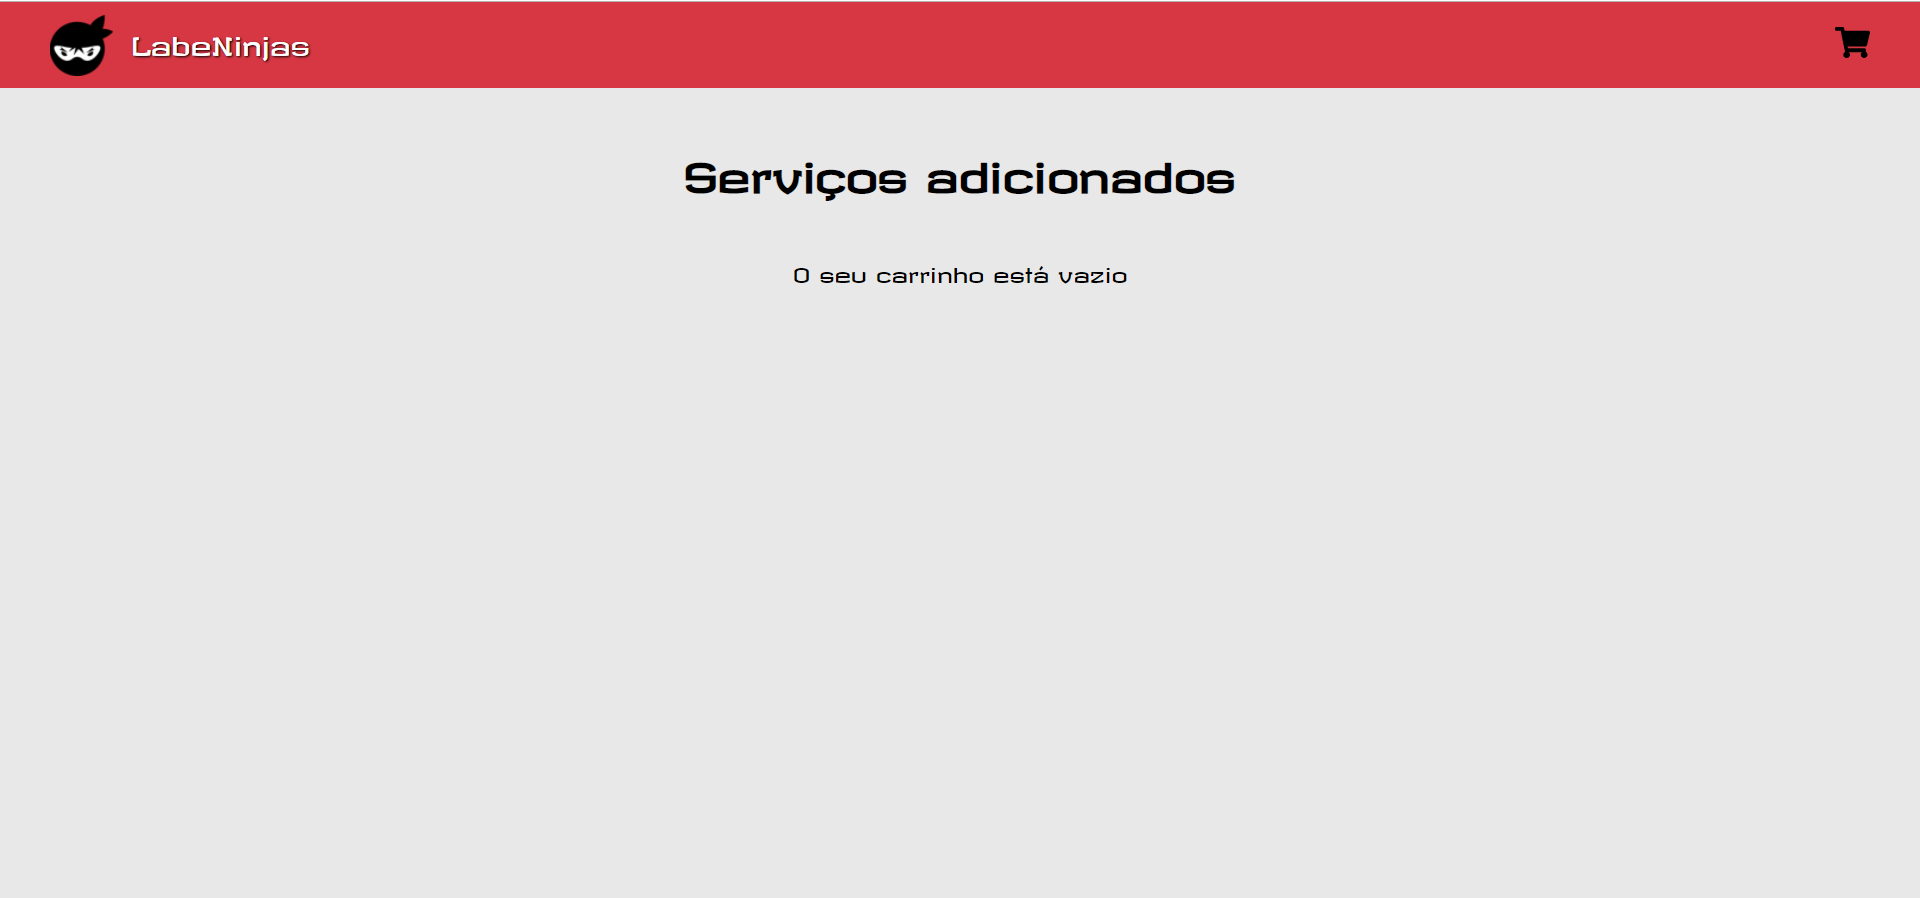
O projeto Labeninjas foi desenvolvido para dois tipos de pessoas: aquelas que querem oferecer algum tipo de serviço e aquelas que buscam algum tipo de serviço. No LabeNinjas é possível encontrar profissionais capacitados para realizar as mais diversas tarefas. Já se você está precisando de uma grana extra, pode cadastrar o seu serviço de forma detalhada, especificando o valor cobrado, formas de pagamento e prazo para realizar o serviço.
Como o próprio slogan diz, no LabeNinjas você encontra o melhor serviço, na velocidade de um ninja.
set up default.yaml using your bot token (example config)
maybe look at the other settings?
deployment
run npm install, or npm install --production or npm ci --only=production
if you’re not planning on doing any code changes
run npm start, or npm run forever for production; see pm2 docs for
further configuration options
due to the fact npx prefers system commands, if you want to add config to
the process (eg log rotation) you should install pm2 globally beforehand.
how convenient for you!
pray to whatever god that it doesn’t nuke your computer
build script opts
usage: node build [-hsfn] [--no-install]

conniebot build script.

-h, --help      print out this message and quit.
-s, --start     watch files for development using nodemon.
-f, --forever   run conniebot in production using pm2 (open source version).
-n, --name      process name if running in forever mode. (default: conniebot)
--no-install    pass `--no` to npx, so you don't waste time installing nodemon
                or pm2.

 https://github.com/hanmajid/arco_design_icons
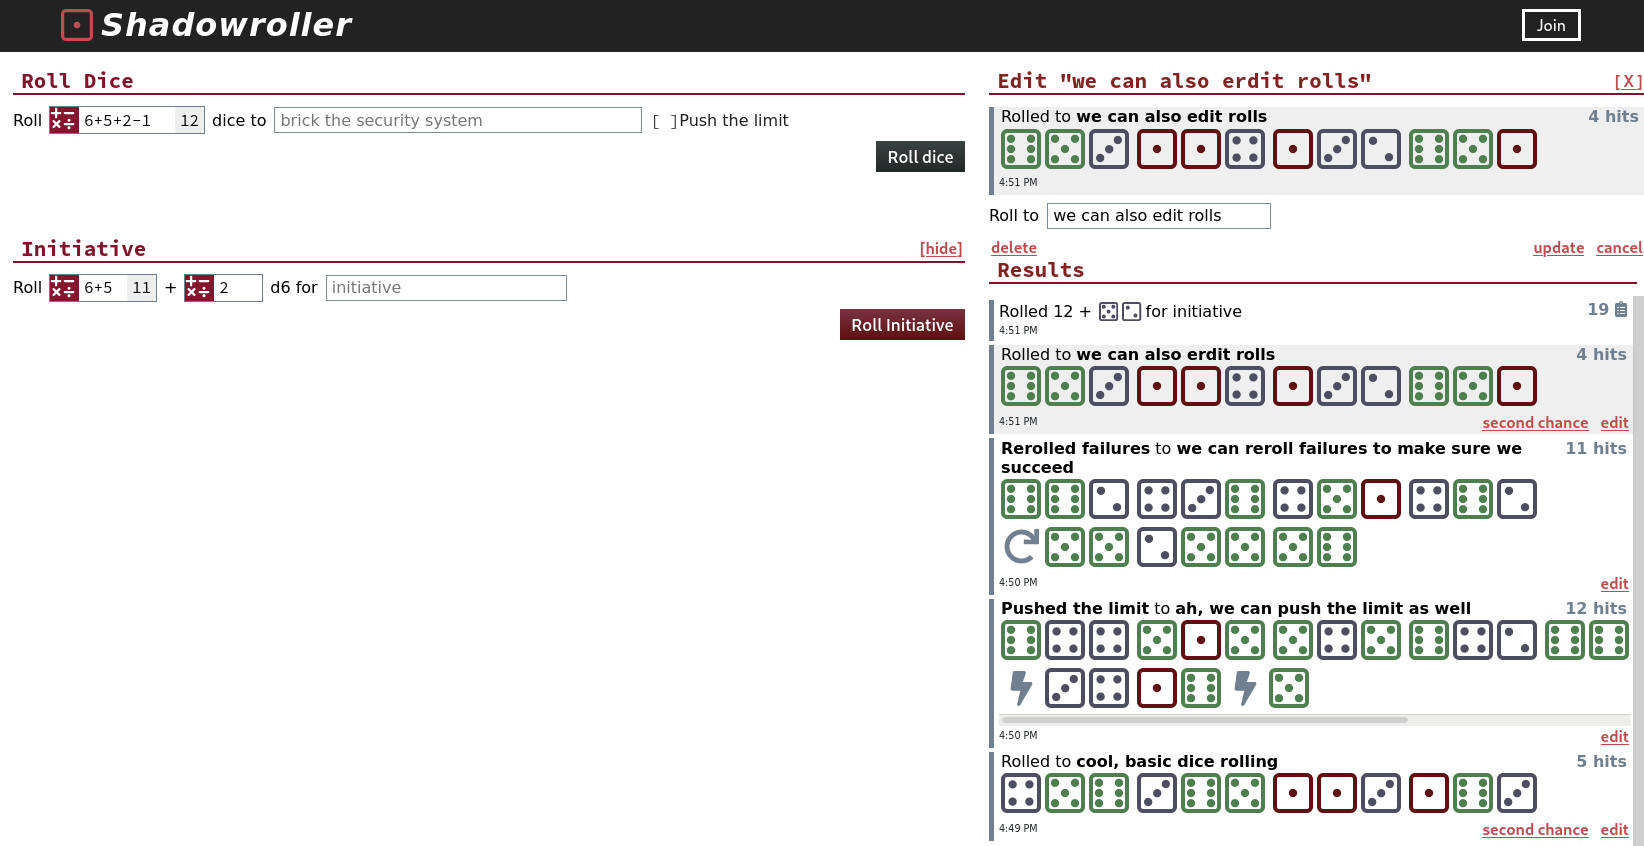


/3-3.1.1.jpg)
/4-3.1.2.jpg)
/5-3.2.1.jpg)
/6-3.2.2a.jpg)
/7-3.2.2b.jpg)
/8-3.2.2c.jpg)
/9-3.6.1.jpg)
/10-3.6.2a.jpg)
/11-3.6.2b.jpg)
/12-3.7.1.jpg)
/13-3.7.2.jpg)
/14-3.8.1.jpg)
/15-3.8.2a.jpg)
/16-3.8.2b.jpg)
/17-3.8.2c.jpg)
/31-5.1.1.jpg)
/38-5.1.5a.jpg)
/39-5.1.5b.jpg)
/40-5.1.5c.jpg)
/46-5.31..jpg)
/47-5.32.jpg)