A PHP Class that reads JSON file as a database. Use for sample DBs.
Usage
Install package composer require jajo/jsondb
Initialize
<?phpuseJajo\JSONDB;
$json_db = newJSONDB( __DIR__ ); // Or passing the directory of your json files with no trailing slash, default is the current directory. E.g. new JSONDB( '/var/www/html/json_files' )
Inserting
Insert into your new JSON file. Using users.json as example here
NB:Columns inserted first will be the only allowed column on other inserts
Thanks to Tarun Shanker for this feature. By passing the order_by() method, the result is sorted with 2 arguments of the column name and sort method – JSONDB::ASC and JSONDB::DESC
Refactor of BSC’s performance analysis tools to generate fundamental POP metrics.
Description
KapitanPOP is an effort to refactor and enchance BSC’s performance analysis tools (Paraver, Dimemas, BasicAnalysis) in order to leverage present technologies. With the usage of nowaday’s libraries for fast I/O, data analysis and distributed programming KapitanPOP offers the same funcionalities as BSC’s Basic Analysis framework, but in a scalable way with better performances and less memory consumption.
KaptainPOP has 2 ultimate goals: to ease the work of HPC application performance analysts within the POP project, enabling faster efficiency metrics processing, and the proof-of-concept of promising libraries and technologies for the sake of trace analysis, which in the end is nothing else than pure data analysis.
Installation
You can install KapitanPOP in two ways: using Singularity containers and downloading KapitanPOP’s image from the cloud; or manual installation. I strongly recommend using KapitanPOP through Singularity containers because installing manually dependencies can be frustrating.
Singularity
After installing Singularity containers on your computer you only have to pull KapitanPOP’s image from its Singularity Hub repository and run it.
PyTables – Package used by Dask to manage datasets from HDF5 files
Dimemas (optional) – Network simulator tool for message-passing programs
You should be able to install Pandas, Numpy, h5py and PyTables on your computer very easily using pip install, for example:
$pip install pandas numpy h5py tables
or easier:
$pip install -r requirements.txt
To install HDF5-1.12.0 the best approach is to download the sources and install them on your computer.
For Dask you must install it from source from its master branch on GitHub
because the official releases have some issues related to HDF5.
Dimemas is not a key dependency. You can run KapitanPOP without it, but you will miss some performance metrics
(transfer and serialization efficiency).
Once dependencies are satisfied, you can install KapitanPOP. You might need to modify the Makefile if your HDF5 libraries are not installed in a standard system path.
$git clone https://github.com/TovRudyy/KapitanPOP.git
$cd KapitanPOP
$mkdir -p obj bin
$make
IMPORTANT: KapitanPOP does not work with gcc10.
Current Functionalities
Parsing of Paraver trace files into HDF5 file format
KapitanPOP can read data from .row and .prv files and write it into an equivalent HDF5 file. For this, a little C program to parse .prv files is used. The resulting HDF5 file contains all the data of the original Paraver file, but in a tabular format divided in dataframes of States, Events and Communications. The resulting HDF5 contains an equivalent version of the .row and .prv data in a more convenient way for fast I/O.
Metrics computation of the multiplicative POP model
KapitanPOP can generate an identic CSV file as the original modelfactors with POP metrics of te multiplicative model:
Parallel efficiency
Load balance
Communication efficiency
Serialization efficiency
Transfer efficiency
Computation scalability
Global efficiency
IPC scalability
Frequency scalability
Speedup
And the data where those metrics come from:
Average useful IPC
Average useful frequency
Runtime
Runtime (ideal)
Useful duration
Useful duration (ideal)
Useful instructions
Useful cycles
Usage
A quick help is available running $./kapitanPOP.py --help
To generate a modelfactors.csv file with POP metrics $./kapitanPOP.py trace1.prv trace2.prv trace3.prv ...
It also accepts regex expressions. By default it will not simulate the application execution on an ideal network. To enable the compute of ideal performance metrics (transfer & serialization efficiency) you will have to add the --dim option flag $./kapitanPOP.py --dim trace...
To only parse a Paraver trace (.row and .prv files) into an equivalent HDF5 file $./kapintanPOP.py -p trace.prv
You can tune how the parser performs in order to limit the maximum memory and disk usage. By default, the parser process the .prv file in chunks of 1GB and does not apply compression to the resuling HDF5. You can can change those setting with --chunk_size and --comp_lvl option flags.
IMPORTANT: curently the parsed file is between two and three times bigger than the original Paraver file. This is a necessary trade-off for a better memory usage and speeds when analysing the trace. If your computer has limited disk space, you should run KapitanPOP with --comp_lvl 1 (compression level 1). This will notably reduce the size of the file (between 5 and 10 times less), though the parse time will increase in exchange.
If when using KapitanPOP you get an error like this unable to lock file, errno = 11, error message = 'Resource temporarily unavailable', try exporting the environment variable HDF5_USE_FILE_LOCKING to FALSE before running the too.
export HDF5_USE_FILE_LOCKING=FALSE
TODO
Implement a .pcf parser
Implement the additive model
Improve execution times and memory usage when analysing traces (kapitanPOP.py)
Benchmark KapitanPOP
Proof-of-concept running KapitanPOP using multiples nodes through Dask
Refactor Dimemas simulator
Disclaimer
KapitanPOP is at the moment in a continuous developing & testing phase, therefore you should use it on your own responsibility. You might encounter bugs, wrong results and situations where the software crashes or, in the worst cases, devours your entire memory and never finishes. If you experience any problem with the software, you are welcome to open an issue or send an email to oleksandr.rudyy[at]hlrs.de describing your finding.
ASK SDK DynamoDB Persistence Adapter package contains implementation of persistence adapter in Core SDK (‘ask-sdk-core’) based on AWS SDK v3.
What is ASK SDK v2 for Node.js
The ASK SDK v2 for Node.js is an open-source Alexa CustomSkill Development Kit. ASK SDK v2 for Node.js makes it easier for you to build highly engaging skills, by allowing you to spend more time on implementing features and less on writing boiler-plate code.
Installing
ASK SDK DynamoDB Persistence Adapter package is an addon package for the core SDK (‘ask-sdk-core’) and thus has peer dependency of the core SDK package. From within your NPM project, run the following commands in the terminal to install them:
The ASK SDK DynamoDB Persistence Adapter package for Node.js bundles TypeScript definition files for use in TypeScript projects and to support tools that can read .d.ts files. Our goal is to keep these TypeScript definition files updated with each release for any public api.
Pre-requisites
Before you can begin using these TypeScript definitions with your project, you need to make sure your project meets a few of these requirements:
Use TypeScript v2.x
Includes the TypeScript definitions for node. You can use npm to install this by typing the following into a terminal window:
npm install --save-dev @types/node
In Node.js
To use the TypeScript definition files within a Node.js project, simply import ask-sdk-dynamodb-persistence-adapter as below:
For bug reports, feature requests and questions, we would like to hear about it. Search the existing issues and try to make sure your problem doesn’t already exist before opening a new issue. It’s helpful if you include the version of the SDK, Node.js or browser environment and OS you’re using. Please include a stack trace and reduced repro case when appropriate, too.
License
This SDK is distributed under the Apache License, Version 2.0, see LICENSE for more information.
A real-time audio group chat implementation enabling voice and text communication between humans and AI agents. This project combines WebRTC, speech-to-text, text-to-speech, and LLM capabilities to create interactive conversations with AI agents.
Features
Real-time audio communication using WebRTC
Multiple AI agents with distinct voices and personalities
Text-to-Speech (TTS) with customizable voice options
Speech-to-Text (STT) for human voice input
Round-robin speaker selection for balanced conversations
Gradio-based web interface for easy interaction
Support for both voice and text channels
Prerequisites
Python 3.8+
Node.js (for frontend components)
Ollama (for local LLM support)
Installation
Clone the repository:
git clone <repository-url>cd AudioGroupChat
Create and activate a virtual environment:
python -m venv .venv
source .venv/bin/activate  # On Windows: .venv\Scripts\activate
Install dependencies:
pip install -r requirements.txt
Configuration
Configure Ollama settings in main_app.py:
config_list= [{
"model": "gemma3:1b", # or other supported models"base_url": "http://localhost:11434/v1",
"price": [0.00, 0.00],
}]
(Optional) Set up Twilio TURN server credentials for improved WebRTC connectivity:
Nomura, Junta. 2020. Betonamugo oyobi Nihongo niokeru Kangokei Goi no Hinshisei no Taisho [Đối chiếu từ loại của từ vựng gốc Hán trong tiếng Việt và tiếng Nhật]. Luận văn tốt nghiệp, Đại học Ngoại ngữ Tokyo.
ID [TAB] Tiếng Việt [TAB] Chữ Hán [TAB] Từ loại trong tiếng Việt [TAB] Có từ vựng tương đương trong tiếng Nhật [TAB] Cách đọc trong tiếng Nhật [TAB] Từ loại trong tiếng Nhật
Trong trường hợp từ vựng có hai từ loại trở lên, dấu ngắt là ,
Trong trường hợp từ vựng đó không được sử dụng trong tiếng Nhật, _(gạch dưới)sẽ được hiện trong “Cách đọc trong tiếng Nhật” và “Từ loại trong tiếng Nhật”
Từ loại trong tiếng Việt
V0, V1, V2, V3: 0/1/2/3 người trong 3 người bản ngữ đã khẳng định rằng động từ đó có thể có tân ngữ(phân biệt nội động từ và ngoại động từ)
# Install dependencies
composer install
# Create and edit the ".env.local" file and add DB params# Run in development mode
php bin/console server:run
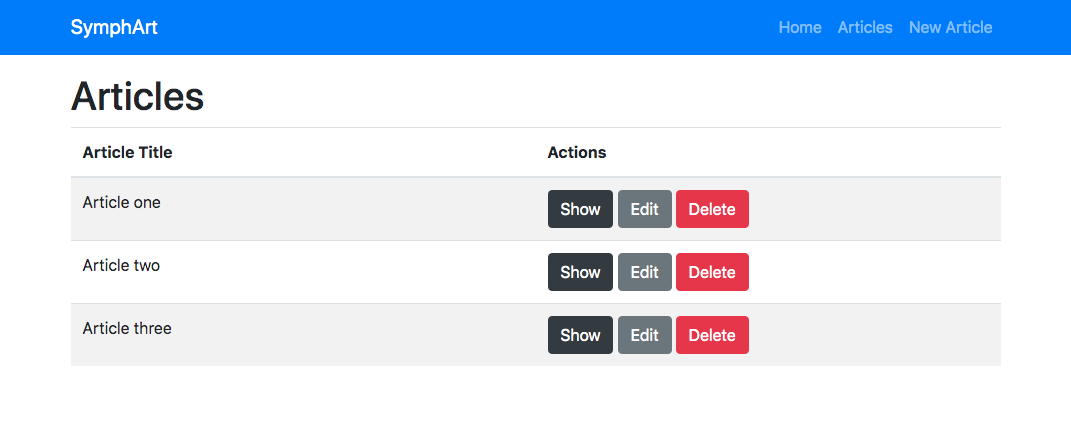
Baby steps for development:
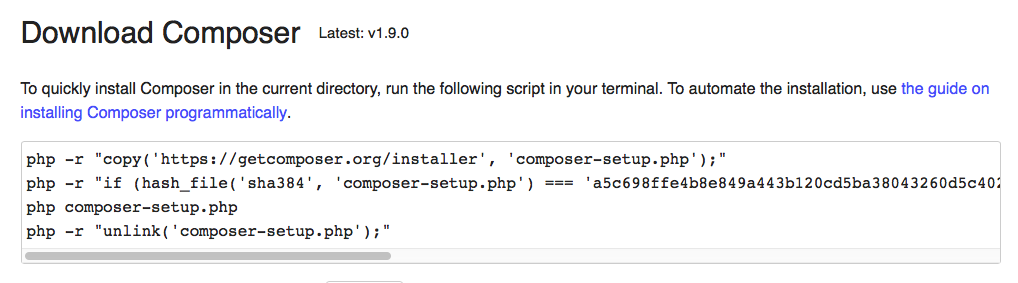
Install Composer (globally)
Check with command: composer -V.
Then navigate to directory “/Applications/XAMPP/xamppfiles/htdocs/sites” (or your public web server directory) and create a new Symfony proyect with this command: composer create-project symfony/skeleton symphart.
NOTE: I created this project inside a folder called “sites” but you can skip that folder if you prefer create a virtual host. Another option is use “Symfony PHP web server” as described after.
Start your web server (Apache) and load in your browser this URL: http://localhost/sites/symphart/public/
TIP: You can create a basic .htaccess file inside “/public” folder.
Install “Symfony PHP web server” using command: composer require symfony/web-server-bundle --dev.
Creater your first controller:
// src/Controller/ExampleController.php

<?php
	namespace App\Controller;

	use Symfony\Component\HttpFoundation\Response;

	class ExampleController {
		public function index() {
			return new Response('<html><body><h1>It's just an example</h1></body></html>');
		}
	}
For start server in development mode: php bin/console server:run. Observe how a web server start serving your applicattion on localhost on an specific port.
Et Voilà! You are ready to work.
Optional development steps:
Install Annotations to define routes inside controllers: composer require annotations
Install Twig as template engine: composer require twig
If you want to use a database, you must create a copy of file .env and rename as .env.local and then define your SQL credentials and database name.
Then execute php bin/console doctrine:database:create.
Now you can create entities with the command php bin/console make:entity Foo (where “Foo” will be the name of entity). You can use the same command to update an existing entity
Execute php bin/console doctrine:migrations:diff to create migration file. Database migrations are a way to safely update your database schema both locally and on production. Then execute the migration with the command php bin/console doctrine:migrations:migrate. Now your database will be upgrade to new structure.
If you edit Entity files, you need to run php bin/console doctrine:migrations:diff and php bin/console doctrine:migrations:migrate commands to sync database.
CCNN is a framework for optimizing convolutional neural networks with linear constraints.
It has been shown to achieve state-of-the-art results on the task of weakly-supervised semantic segmentation.
It is written in Python and C++, and based on Caffe.
It has been published at ICCV 2015. It was initially described in the arXiv report.
If you find CCNN useful in your research, please cite:
@inproceedings{pathakICCV15ccnn,
    Author = {Pathak, Deepak and Kr\"ahenb\"uhl, Philipp and Darrell, Trevor},
    Title = {Constrained Convolutional Neural Networks for Weakly Supervised Segmentation},
    Booktitle = {International Conference on Computer Vision ({ICCV})},
    Year = {2015}
}
License
CCNN is released under academic, non-commercial UC Berkeley license (see LICENSE file for details).
To verify this do : ccmake ./ inside the build folder and manually check the following things : MAKE_CXX_COMPILER, CMAKE_C_COMPILER , PYTHON_EXECUTABLE , PYTHON_INCLUDE_DIR , PYTHON_LIBRARY
Make sure that cmake doesn’t mess the anaconda boost to system boost.
Configure path (if needed) in src/user_config.py.
(Optional — I don’t do it) If everything runs fine, set CMAKE_BUILD_TYPE using ccmake . to Release. This prevents eigen from checking all assertions etc. and works faster.
3) Usage
Demo CCNN.
cd ccnn
bash ./models/scripts/download_ccnn_models.sh
# This will populate the `ccnn/models/` folder with trained models.
python ./src/demo.py
Train CCNN.
cd ccnn
bash ./models/scripts/download_pretrained_models.sh
# This will populate the `ccnn/models/` folder with imagenet pre-trained models.
python ./src/train.py 2> log.txt
Test CCNN.
cd ccnn
python ./src/test.py  # To test IOU with CRF post-processing
python ./src/test_argmax.py  # To test IOU without CRF
4) Scripts Information
Model Prototxts:
models/fcn_8s/ : Atrous algorithm based 8-strided VGG, described here.
models/fcn_32s/ : 32-strided VGG
Configure:
src/config.py : Set glog-minlevel accordingly to get desired caffe output to terminal
Helper Scripts:
src/extras/ : These scripts are not needed to run the code. They are simple helper scripts to create data, to prepare pascal test server file, to add pascal cmap to segmentation outputs etc.